
An uncle, who works as a volunteer at a home for people with dementia, asked me whether I could convert an old rotary dial phone into an MP3 player with nostalgic songs and radio fragments. Recognizing the old faithful PTT telephone with dial, and listening to old remembered songs, often turns out to be a feast of recognition.
In the meantime I already built a bunch of 'Nostalphones' and also figured out how, besides the trusted T65 device of the Dutch PTT, a contemporary retro-model dial telephone (the widely available GPO746 remake) could be transformed into a music player as well.
The idea of using an retro dial phone for modern projects is not completely new. After a small search, it turned out that quite a few people had already been busy reading the pulses from the dial of such vintage telephones. The basic idea of my uncle turned out to be the Dutch 'Wonderfoon'. But while experimentally building this design (built around a complete Raspberry Pi with Linux OS), it seemed unnecessarily complex and quite limited with ten sound clips only. In the meantime, the 'inventor' has also realized this and now offers a 'central' module with which any telephone can be used to listen to audio fragments. And fortunately, quite a bit of functionality has been added as well. Another provider offers kits to convert a T65 yourself. They also provide great instructions, but use a Wemos D1 Mini or ATTiny85 instead of the Arduino Nano I would like to use.
In short, a lot is already for sale, but crafting something yourself is of course the most fun. Maybe I can inspire or help others with my notes here. Moreover, DIY offers the advantage that you can make it exactly as you want. And in fact quite a few 'own' wishes had crept in along the way. Ideally, if I were to insert a micro SD card, I wanted at least a hundred different audio fragments. I thought it would be nice to also be able to add nostalgic radio fragments (including some from the wartime), I wanted a two-color control LED, a realistic dial tone (nice 'warm' sine wave with the original combination of 150 Hz and 450 Hz) and some useful application for the 'flash' / 'transfer' button on some T65's. And so on 😉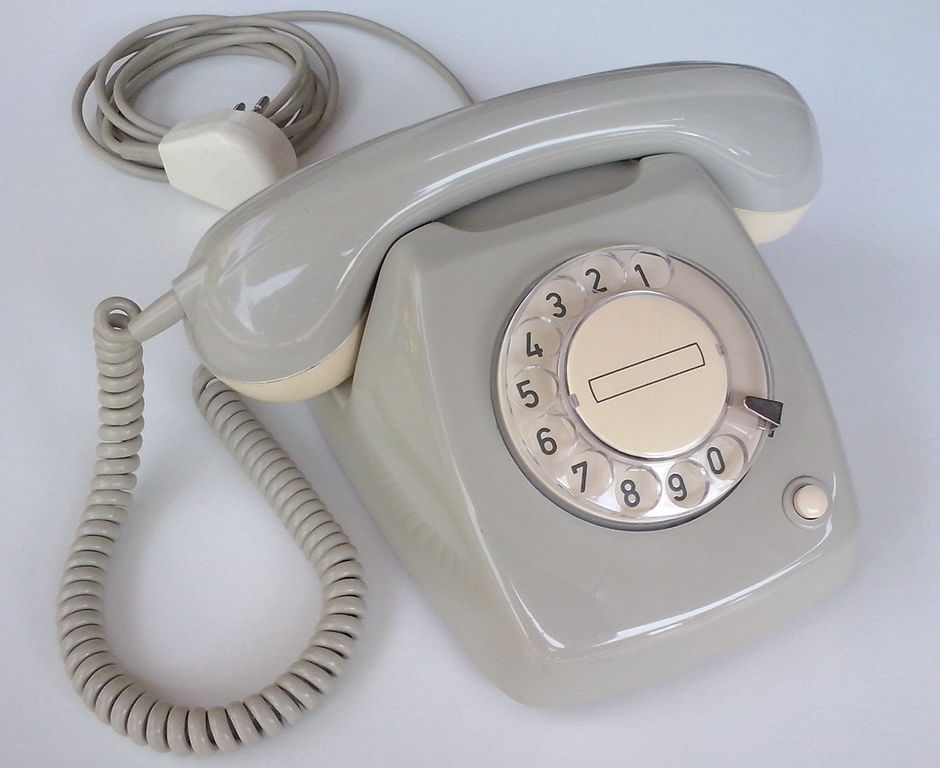
Only on January 1, 1988, the PTT came with a successor to the T65. The new standard rental device was called, unsurprisingly, 'T88' and was adjustable for pulse or tone dialing. In the years that followed, tens of thousands of T65's traded in will have been scrapped by the PTT. Yet a lot of T65 telephones have been preserved. You still come across them regularly on online sales sites or in thrift stores. Fortunately, there is still a lot of information about this striking telephone available online, for example on Wikipedia.
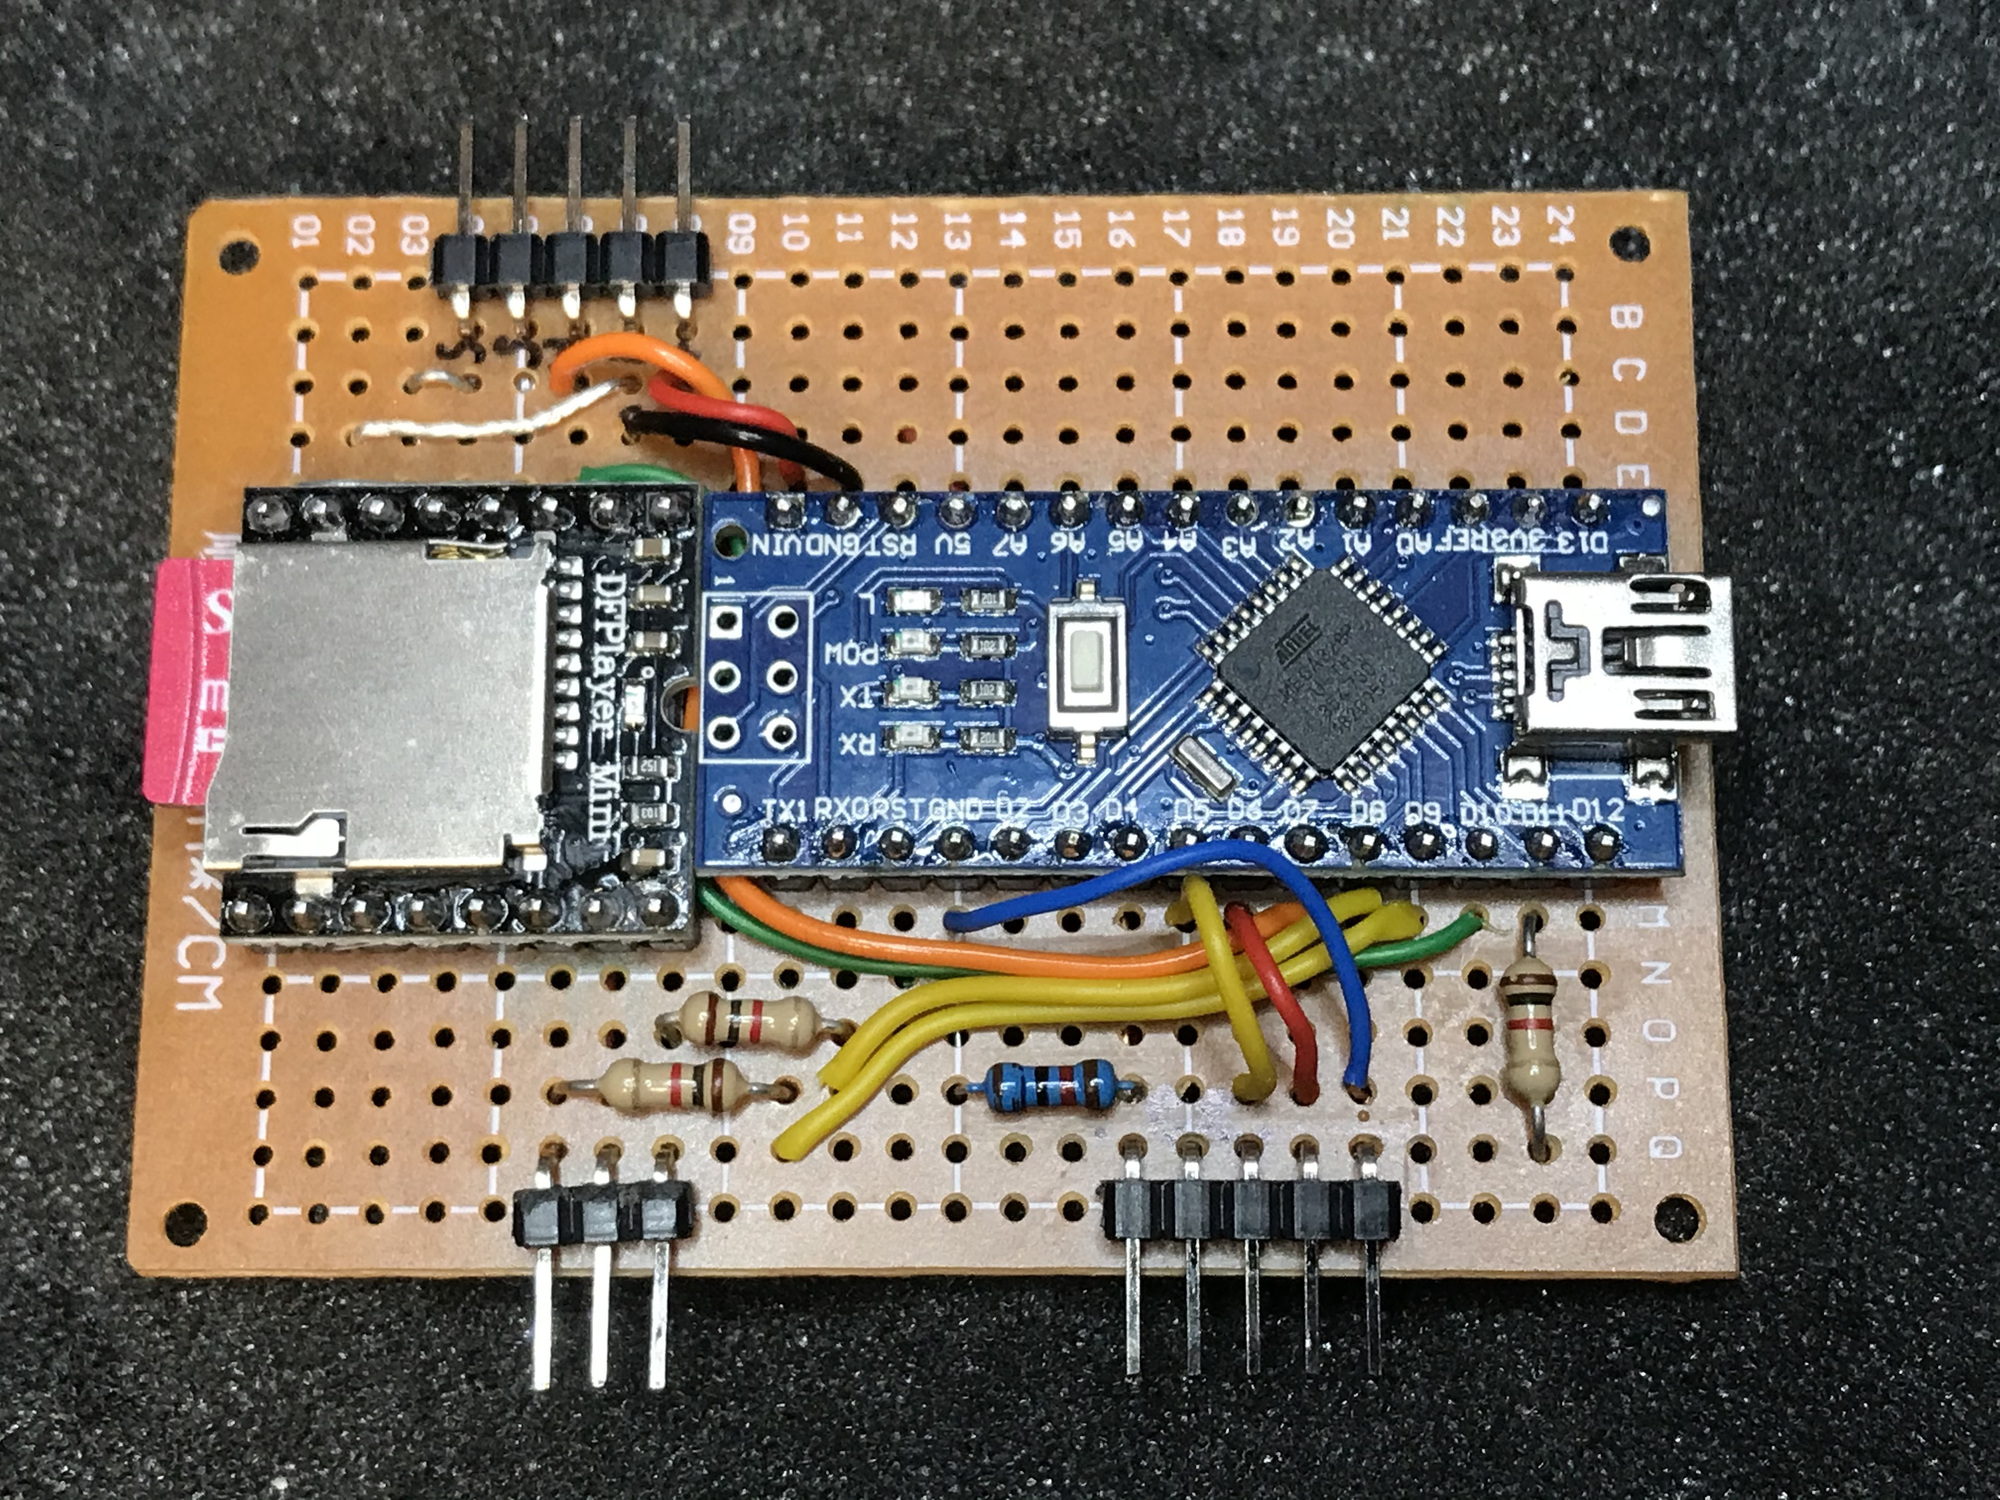
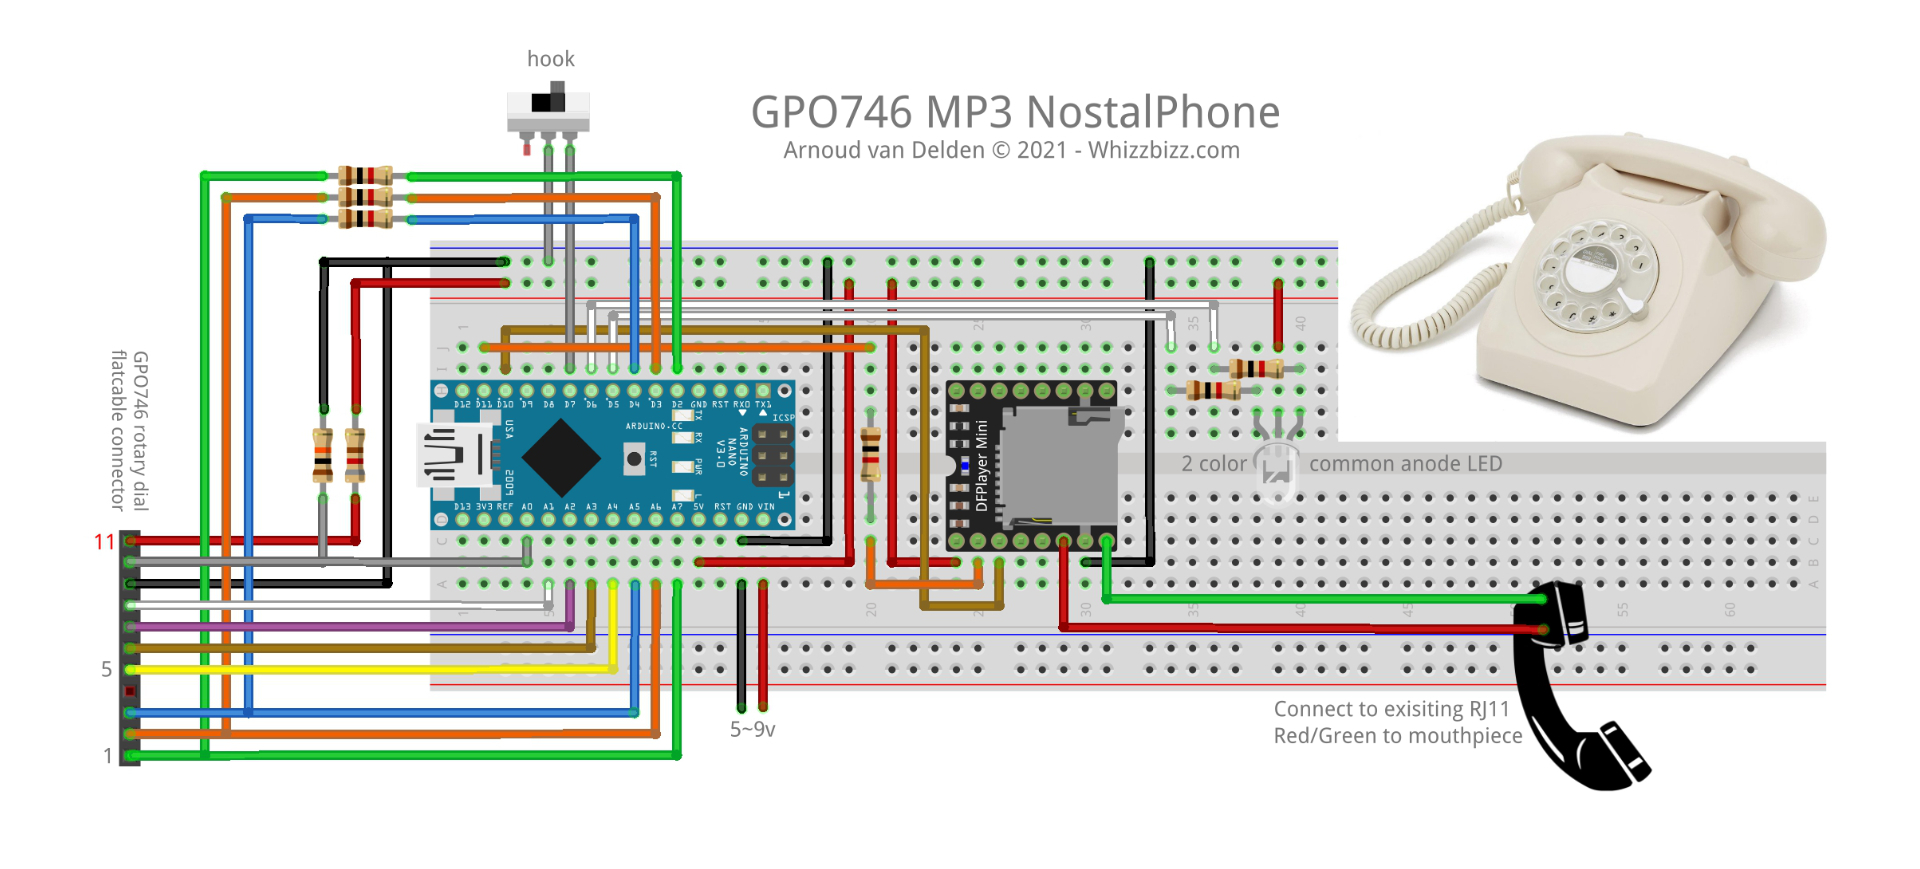
After some playing around I came up with an Arduino Nano and Mini-MP3-player module. This player module can directly play WAV and MP3 audio. After adding some small material (LED, speaker, hole print, etc) and a micro SD card, this is all relatively cheap and easy to solder together.
Add a mains adapter for the supply voltage and the entire desired functionality can be further programmed in the Arduino Sketch. Of course, the success of the project stands or falls with the MP3/WAV tracks and songs available on the micro SD card.
The Arduino Sketch relies on 10 subdirectories, with 10 WAV (or MP3) files each, on the micro SD card. Additionally the first file found in the root of the disk is used as a dial tone. All the addressing of tracks on the SD card is sorted alphabetically by the naming of the subdirectories and files. If you want a reproducible order in this, it is therefore advisable to give the subdirectories names like '01', '02', '03', etc. The sound files can then be named '01.wav', '02.wav', etc. I myself chose WAV mono 32kHz 16 bit audio files and made a small bash script to make the numeric file names on the SD card according to this pattern after copying all the files. Be sure to throw away any invisible (control) files from the SD card so that they do not disturb the sequence. For example, the first file found in the FAT (File Allocation Table) is simply used for the dial tone.
Unfortunately I'm not allowed to publish all WAV files, but the list of audio fragments I collected can be downloaded here as a PDF file.
Here's also the Linux/Bash script I made to keep working with human readable filenames on the SD card until the last minute. Optionally, you may also activate the piece of code that changes the directory names. However, I already chose to just call these '01', '02', etc. in my main library of WAV files.
#!/bin/bash

# Renames dir structure and filenames to numbers. Keeps the file extention...
# AvD nov 2019
#
#subname=1

# First rename the subdirs....
#for subdir in $(find . -maxdepth 1 -type d|sort)
#do
#  if [[ "$subdir" == "." ]]; then
#    continue
#  fi
#  mv $subdir 0$subname
#  echo "$subdir was moved to 0$subname"
#  ((subname=subname+1))
#done

# Now do the individual files...
for subdir in $(find . -maxdepth 1 -type d|sort)
do
  if [[ "$subdir" == "." ]]; then
    continue
  fi
  filecntr=1;
  for wavfile in $subdir/*.wav ; do
    if [[ "$wavfile" == "." ]]; then
      continue
    fi
    if [[ "$wavfile" == ".." ]]; then
      continue
    fi
    safename=${wavfile// /_}
    mv "$wavfile" "${wavfile// /_}"
    if [ $filecntr -lt 10 ]; then
      mv $safename $subdir/00${filecntr}.wav
    else
      mv $safename $subdir/0${filecntr}.wav
    fi
    ((filecntr=filecntr+1))
  done
done
find . -type f -name '.[_|DS]*' -exec rm {} \;
echo "All done..."
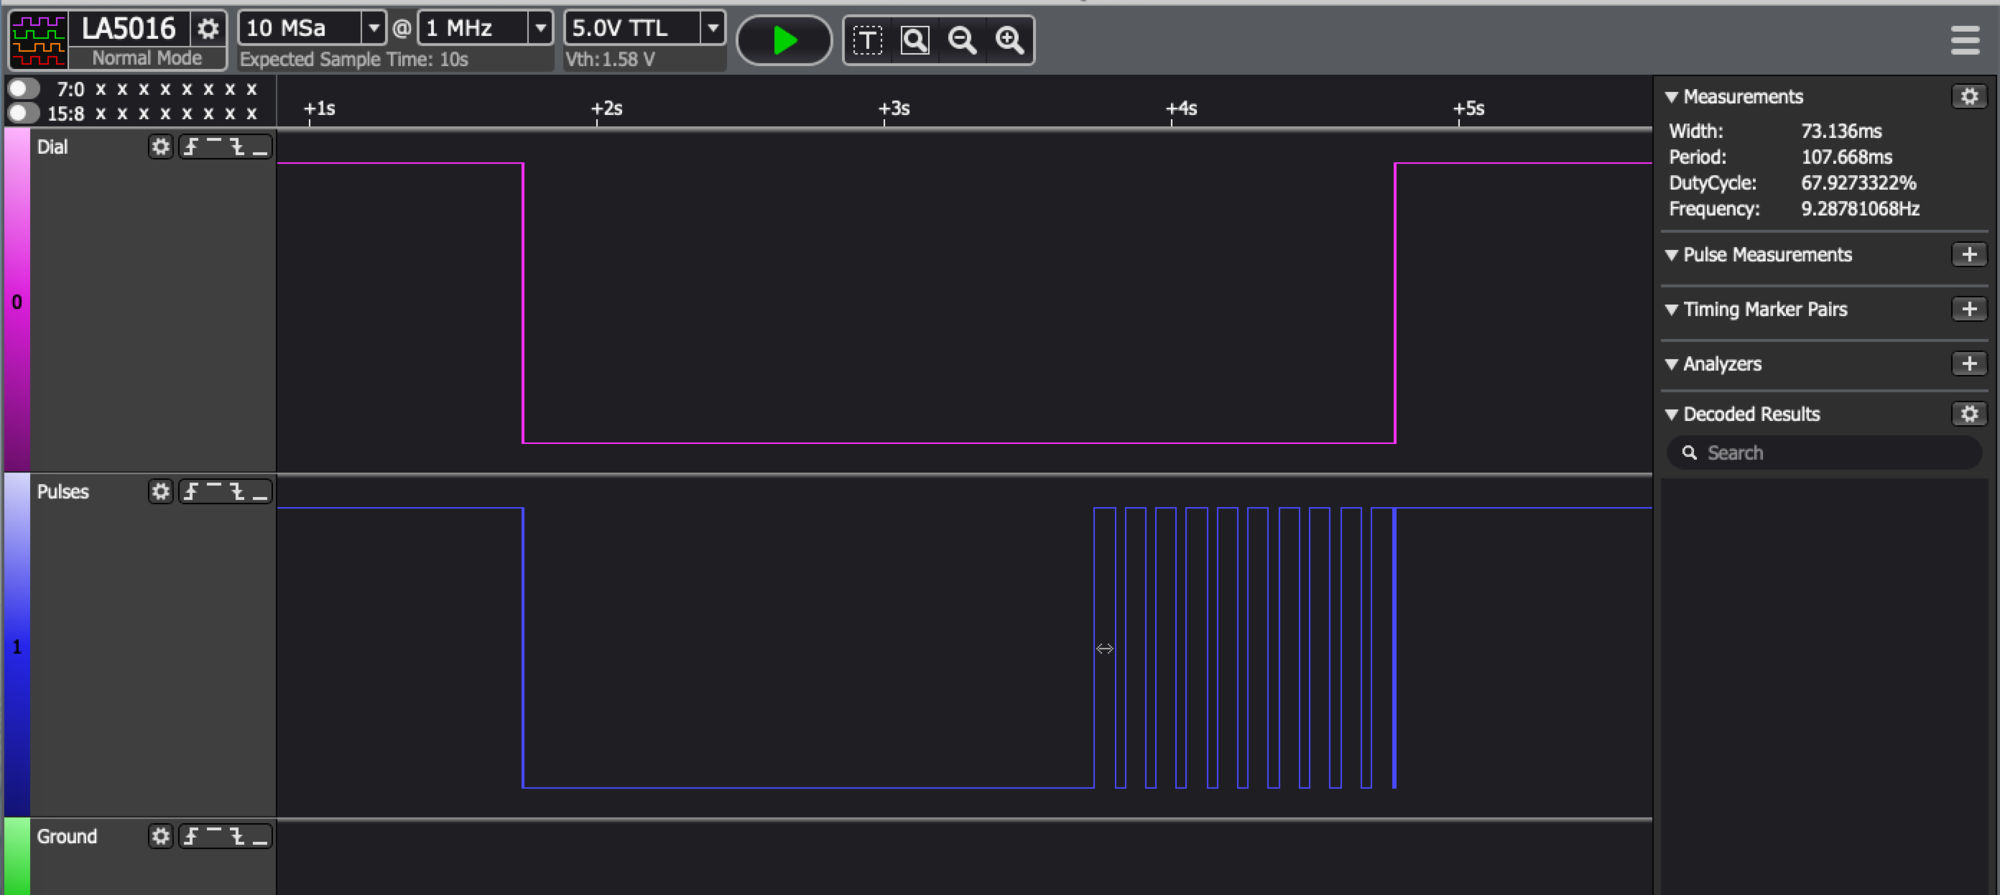
An MP3 / WAV player module is used to play the music fragments, controlled by the Arduino Nano. A small speaker with an impedance of 8Ω replaces the original high-impedance element in the receiver to make the music audible. The Arduino must be able to detect that the receiver is being picked up (the green LED will flash) and then use the number 'chosen' with the dial to play a music fragment. So lets take a look at how to 'read' an old-fashioned dial.
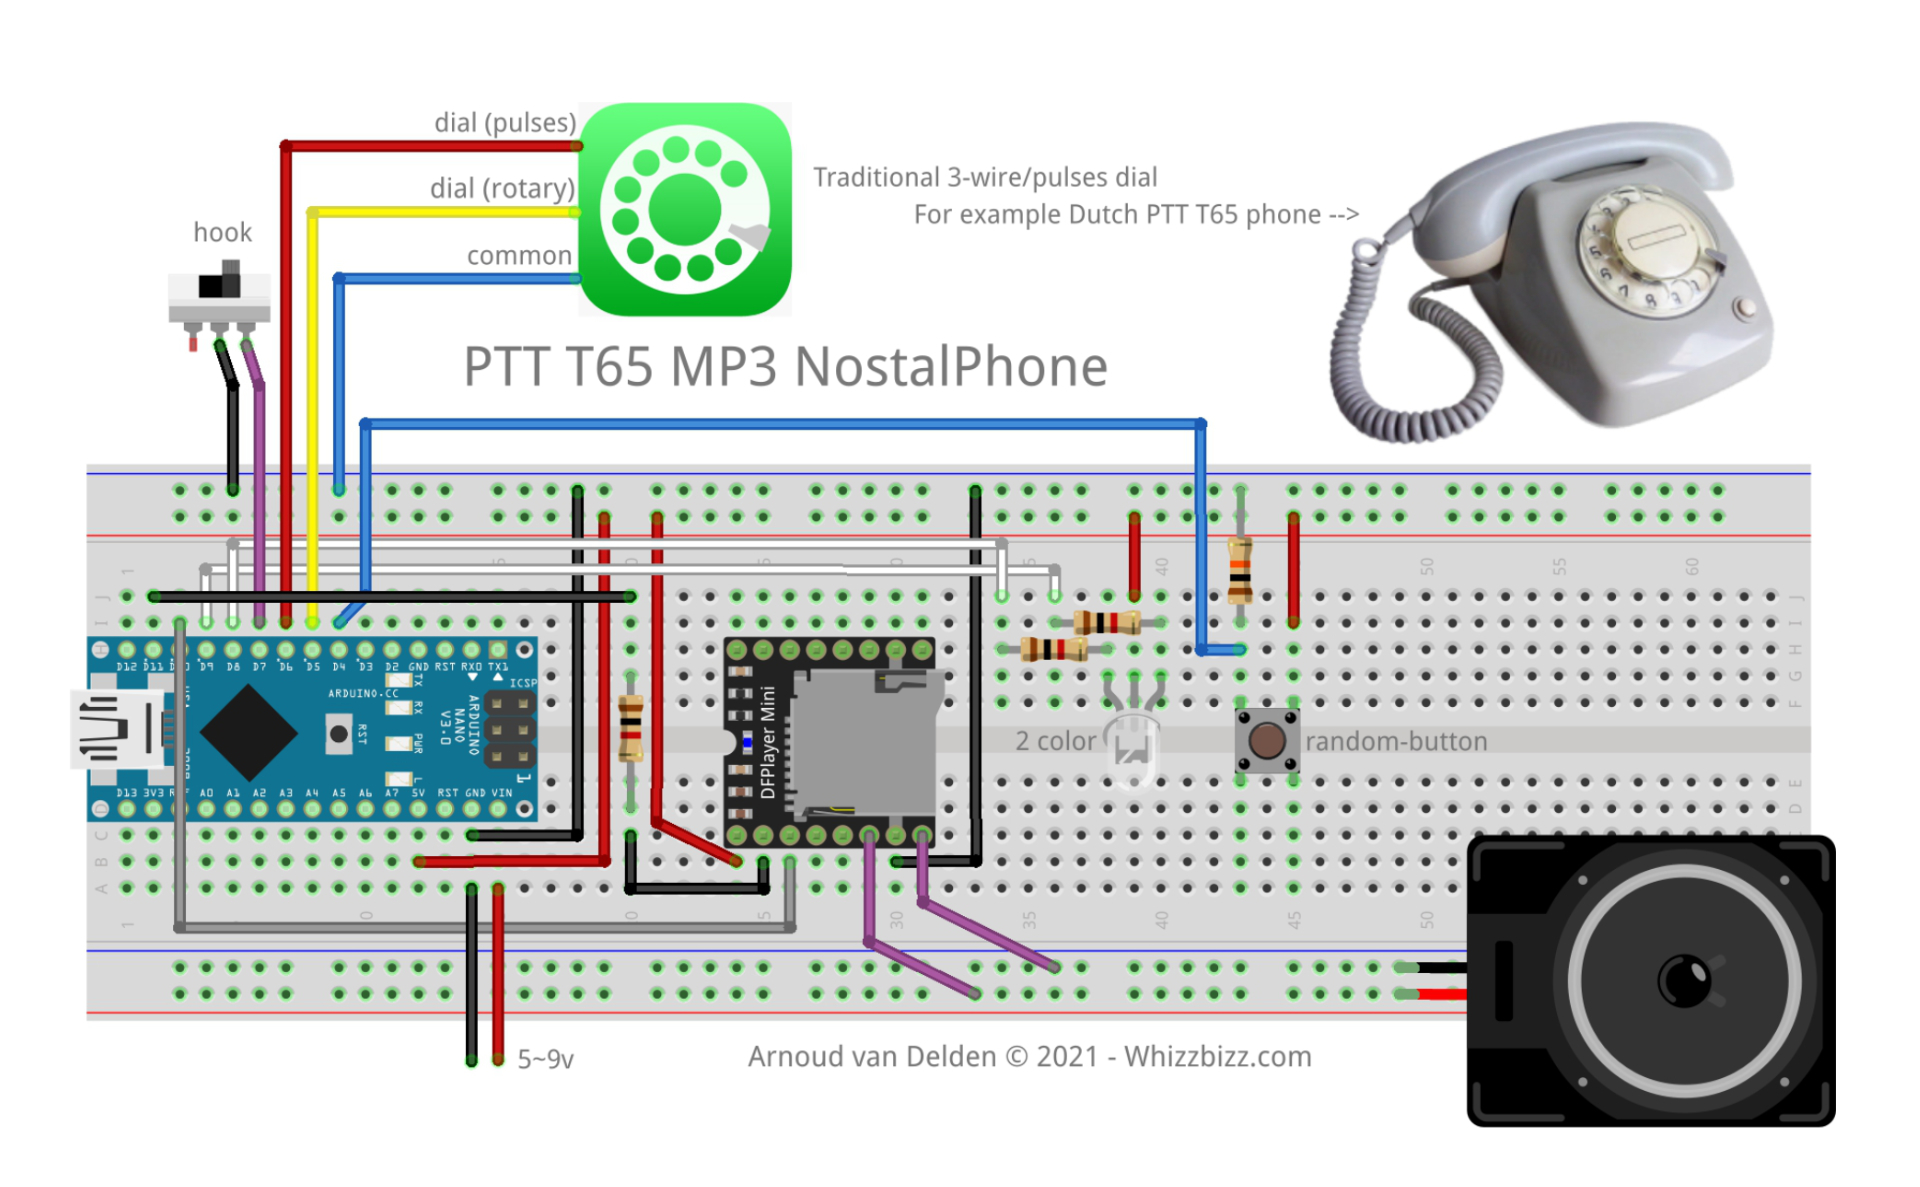
On the right you will find the Arduino Sketch that I made for the T65 phone. To control the WAV / MP3 player over SoftwareSerial I use the DFRobotDFPlayerMini library.
In the front of the T65 I drilled a hole for a 2-color (red / green) LED. When the telephone is in operation, the green LED lights up and flashes when the receiver is lifted. After a number has been dialed, the LED lights up red and it plays the selected audio clip.
Many T65 phones have an additional 'flash' / transfer button under the dial. In the current Sketch a random number is played by the player if that button is pressed.
// Whizzbizz.com - Arnoud van Delden - November 2019 (for 'uncle Thijs')
//
// Nostalphone Sketch for the PTT T65 rotary dial phone. Waits for hook switch and then reads the number from the rotary dial
// The 'flash'-button on the T65 is used to make a direct random selection from all samples, otherwise the first (or only) number
// determines the subdir/bank to be used (each bank has 10 WAVs) and the last number dialed the WAV within this subdirectory/bank.
// Samples are played through DFPlayer (Mini MP3 Player) controlled over SoftwareSerial with RX=10 and TX=11
//
// Expects a SD-card with the correct directory structure of ten banks/subdirs of ten WAVs each
// The bank/subdir 0/ contains the sounds that are played when only one number was dialed
// Otherwise first number is the bank/subdir, last number dialed the sound that is to be played...
// First WAV on SD is played as dial tone, so provide a WAV-file starting with '00' (e.g. '00 Kiestoon350Hz.wav') in the root of the SD card
//

#include "SoftwareSerial.h"
#include "DFRobotDFPlayerMini.h"

#define SD_ChipSelectPin 10
#define BlinkTime 10000
#define rand_button 4 // Random button (high active)
#define input_dial  5 // Rotary dial active (yellow)
#define input_pulse 6 // Rotary dial pulses (green)
#define input_hook  7 // Pin hook switch connected to (purple)
#define led_green   8 // Green LED: lit on power on, flashes when dialing
#define led_red     9 // Red LED: lit when music is played

unsigned long debounce_time_hook  = 0; // Debounce time for this button/pin...
unsigned long debounce_time_dial  = 0; // Debounce time for this button/pin...
unsigned long debounce_time_pulse = 0; // Debounce time for this button/pin...
unsigned long debounce_time_rand  = 0; // Debounce time for this button/pin...
unsigned long dialing_timeout = 0;     // To keep track of dialing time out...
unsigned long debounceDelay = 50;      // Global debounce time...

bool logging = false; // Serial logging during development...
bool hook_up = false;
bool dialing = false;
bool process_number = false;
bool number_detected = false;

int hook_state;
int pulse_state;
int rand_state;
int last_hook_state = LOW;
int last_dialing_state = HIGH;
int last_io_state_pulse = HIGH;
int last_rand_button_state = HIGH;
int last_number_dialed = 0;
int nrs_dialed = 0;
int pulse_count = 0;
int blink_count = 0; // For the blinking LED...

int rotary_dialing;
int io_state_pulse;
int hook_switch_state;
int rand_button_state;

int random_bank;
int random_song;
int bank_nr = 0;

SoftwareSerial mySoftwareSerial(10, 11); // RX, TX
DFRobotDFPlayerMini myDFPlayer;
void printDetail(uint8_t type, int value);

void setup() {
  mySoftwareSerial.begin(9600);
  Serial.begin(38400);

  pinMode(input_hook, INPUT_PULLUP);
  pinMode(input_pulse, INPUT_PULLUP);
  pinMode(input_dial, INPUT_PULLUP);
  pinMode(led_red, OUTPUT);
  pinMode(led_green, OUTPUT);

  logSerial("Nostalphone v1.3");
  logSerial("Initializing DFPlayer...");
  if (!myDFPlayer.begin(mySoftwareSerial)) {  //Use softwareSerial to communicate with mp3.
    logSerial("Unable to begin:");
    logSerial("1.Please recheck the connection!");
    logSerial("2.Please insert the SD card!");
    while(true);
  }
  logSerial("DFPlayer Mini online.");

  myDFPlayer.setTimeOut(500); //Set serial communictaion time out 500ms

  //----Set volume----
  myDFPlayer.volume(15);  //Set volume value (0~30).
  myDFPlayer.volumeUp(); //Volume Up
  myDFPlayer.volumeDown(); //Volume Down
  myDFPlayer.EQ(DFPLAYER_EQ_NORMAL);
  myDFPlayer.outputDevice(DFPLAYER_DEVICE_SD);

  if (0) { // Debug diagnostics only: dumps nr of files in each subfolder of the SD card
    Serial.print("1 nr files = ");
    Serial.println(myDFPlayer.readFileCountsInFolder(1));
    Serial.print("2 nr files = ");
    Serial.println(myDFPlayer.readFileCountsInFolder(2));
    Serial.print("3 nr files = ");
    Serial.println(myDFPlayer.readFileCountsInFolder(3));
    Serial.print("4 nr files = ");
    Serial.println(myDFPlayer.readFileCountsInFolder(4));
    Serial.print("5 nr files = ");
    Serial.println(myDFPlayer.readFileCountsInFolder(5));
    Serial.print("6 nr files = ");
    Serial.println(myDFPlayer.readFileCountsInFolder(6));
    Serial.print("7 nr files = ");
    Serial.println(myDFPlayer.readFileCountsInFolder(7));
    Serial.print("8 nr files = ");
    Serial.println(myDFPlayer.readFileCountsInFolder(8));
    Serial.print("9 nr files = ");
    Serial.println(myDFPlayer.readFileCountsInFolder(9));
    Serial.print("10 nr files = ");
    Serial.println(myDFPlayer.readFileCountsInFolder(10));
  }

  digitalWrite(led_green, LOW);  // turn the green LED on on power on...
  digitalWrite(led_red, HIGH);   // turn the red LED off (HIGH=off)

  logSerial("Setup done...");
}

void logSerial(String message) {
  // Handled overhere so logging to serial can easily be switched off...
  if (logging) Serial.println(message);
  return;
}

void loop() {
  // Read hook state...
  hook_switch_state = digitalRead(input_hook);
  if (hook_switch_state != last_hook_state) {
    debounce_time_hook = millis();
  }
  if ((millis() - debounce_time_hook) > debounceDelay) {
    if (hook_switch_state != hook_state) {
      hook_state = hook_switch_state;
      if (hook_state == HIGH) {
        logSerial("Receiver was picked up. Please dial a number...");
        hook_up = true;
        bank_nr = -1;
        nrs_dialed = 0;
        // Output dial tone...
        myDFPlayer.play(1);
      } else {
        logSerial("Receiver is put back. Thanx for using the Nostalphone!");
        hook_up = false;
        myDFPlayer.stop(); // End dial tone...
        digitalWrite(led_green, LOW);  // turn the green LED on on power on...
        digitalWrite(led_red, HIGH);   // turn the red LED off (HIGH=off)
      }
    }
  }
  last_hook_state = hook_switch_state;

  if (hook_up) {
    // Read rotary dial state...
    rotary_dialing = digitalRead(input_dial);
    if (rotary_dialing != last_dialing_state) {
      debounce_time_dial = millis();
    }

    if ((millis() - debounce_time_dial) > debounceDelay) {
      // Rotary dial T65 dial logic...
      if (!dialing && rotary_dialing==LOW) { // Start using the rotary dial...
        logSerial("Starting dialing phase...");
        process_number = false;
        dialing = true;
        pulse_count = 0;
        nrs_dialed = 0;
        bank_nr = -1;
        myDFPlayer.stop(); // End dial tone...
      }
      if (rotary_dialing==LOW) {
        number_detected = false;
        dialing_timeout = millis(); // Keep resetting timer during dialing...

        // Pulse count logic...
        io_state_pulse = digitalRead(input_pulse);
        if (io_state_pulse != last_io_state_pulse) {
          debounce_time_pulse = millis();
        }
        if ((millis() - debounce_time_pulse) > 20) {
          if (io_state_pulse != pulse_state) {
            pulse_state = io_state_pulse;
            if (io_state_pulse==HIGH) {
              pulse_count++;
            }
          }
        }
        last_io_state_pulse = io_state_pulse;
      }

      if (dialing && rotary_dialing==HIGH) {
        // Rotary dial has walked back...
        number_detected = true;
        if (bank_nr<0) {
          bank_nr = pulse_count;
          logSerial("bank_nr: "+(String)bank_nr);
        }
      }

      if (number_detected==true && pulse_count>0) {
        last_number_dialed = pulse_count;
        nrs_dialed++;
        logSerial("last_number_dialed: "+(String)last_number_dialed);
        pulse_count = 0;
        number_detected = false;
      }

      if (dialing && ((millis() - dialing_timeout) > 1500)) {
        // Dial time out reached...
        logSerial("Dialing finished...");
        process_number = true;
        dialing = false;
      }
    }
    last_dialing_state = rotary_dialing;

    if ((hook_up || dialing) && digitalRead(led_red)) {
      // Blink LED...
      if (blink_count > BlinkTime) {
        blink_count = 0;
        // Toggle blink...
        digitalWrite(led_green, !digitalRead(led_green));  // Toggle the green LED...
      }
      blink_count++;
    }

    // Read rand_button state...
    rand_button_state = digitalRead(rand_button);
    if (rand_button_state != last_rand_button_state) {
      debounce_time_rand = millis();
    }
    if ((millis() - debounce_time_rand) > debounceDelay) {
      if (rand_button_state != rand_state) {
        rand_state = rand_button_state;
        if (rand_state == HIGH) {
          digitalWrite(led_green, HIGH);  // turn the green LED on on power off...
          digitalWrite(led_red, LOW);   // turn the red LED on (HIGH=off)
          process_number = false;
          random_bank = random(9)+1;
          random_song = random(9)+1;
          logSerial("Random bank "+(String)random_bank+" song "+(String)random_song);
          myDFPlayer.playFolder(random_bank, random_song); // Play a random song...
        }
      }
    }
    last_rand_button_state = rand_button_state;

    if (process_number) {
      if (nrs_dialed==1) bank_nr = 1; // Only one number dialed: use default bank 1...

      // Play WAV....
      logSerial("bank_nr "+(String)bank_nr+" song "+(String)last_number_dialed);
      digitalWrite(led_green, HIGH); // Power off green LED...
      digitalWrite(led_red, LOW);    // Turn the red LED on (HIGH=off)

      process_number = false;
      if (myDFPlayer.available()) {
        printDetail(myDFPlayer.readType(), myDFPlayer.read()); //Print the detail message from DFPlayer to handle different errors and states.
      }
      myDFPlayer.playFolder(bank_nr, last_number_dialed); // Play the song...
    }
  } // End hook_up...
}

void printDetail(uint8_t type, int value) {
  switch (type) {
    case TimeOut:
      logSerial("DFPlayer: Time Out!");
      break;
    case WrongStack:
      logSerial("DFPlayer: Stack Wrong!");
      break;
    case DFPlayerCardInserted:
      logSerial("DFPlayer: Card Inserted!");
      break;
    case DFPlayerCardRemoved:
      logSerial("DFPlayer: Card Removed!");
      break;
    case DFPlayerCardOnline:
      logSerial("DFPlayer: Card Online!");
      break;
    case DFPlayerUSBInserted:
      logSerial("DFPlayer: USB Inserted!");
      break;
    case DFPlayerUSBRemoved:
      logSerial("DFPlayer: USB Removed!");
      break;
    case DFPlayerPlayFinished:
      logSerial("DFPlayer: Number:"+(String)value+" Play Finished!");
      break;
    case DFPlayerError:
      switch (value) {
        case Busy:
          logSerial("DFPlayerError: Card not found");
          break;
        case Sleeping:
          logSerial("DFPlayerError: Sleeping");
          break;
        case SerialWrongStack:
          logSerial("DFPlayerError: Get Wrong Stack");
          break;
        case CheckSumNotMatch:
          logSerial("DFPlayerError: Check Sum Not Match");
          break;
        case FileIndexOut:
          logSerial("DFPlayerError: File Index Out of Bound");
          break;
        case FileMismatch:
          logSerial("DFPlayerError: Cannot Find File");
          break;
        case Advertise:
          logSerial("DFPlayerError: In Advertise");
          break;
        default:
          break;
      }
      break;
    default:
      break;
  }
}
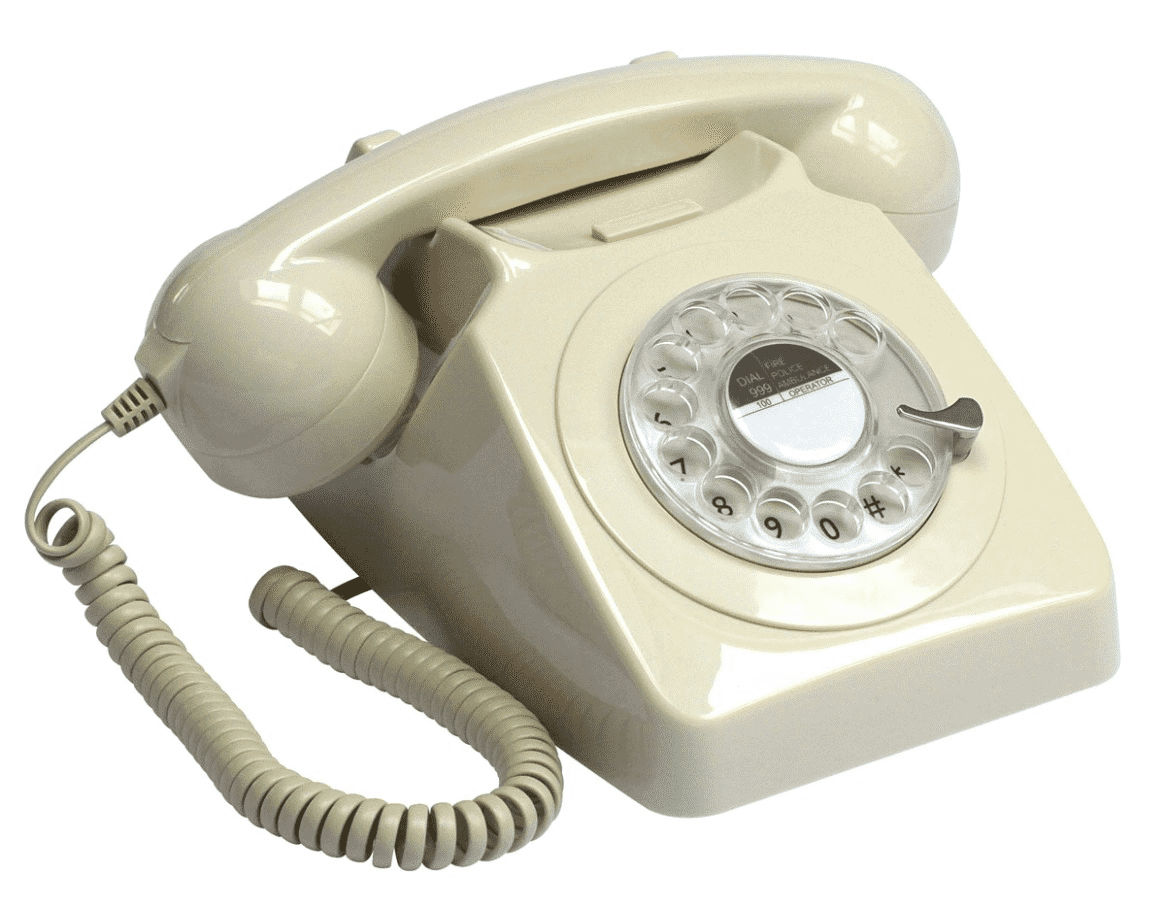
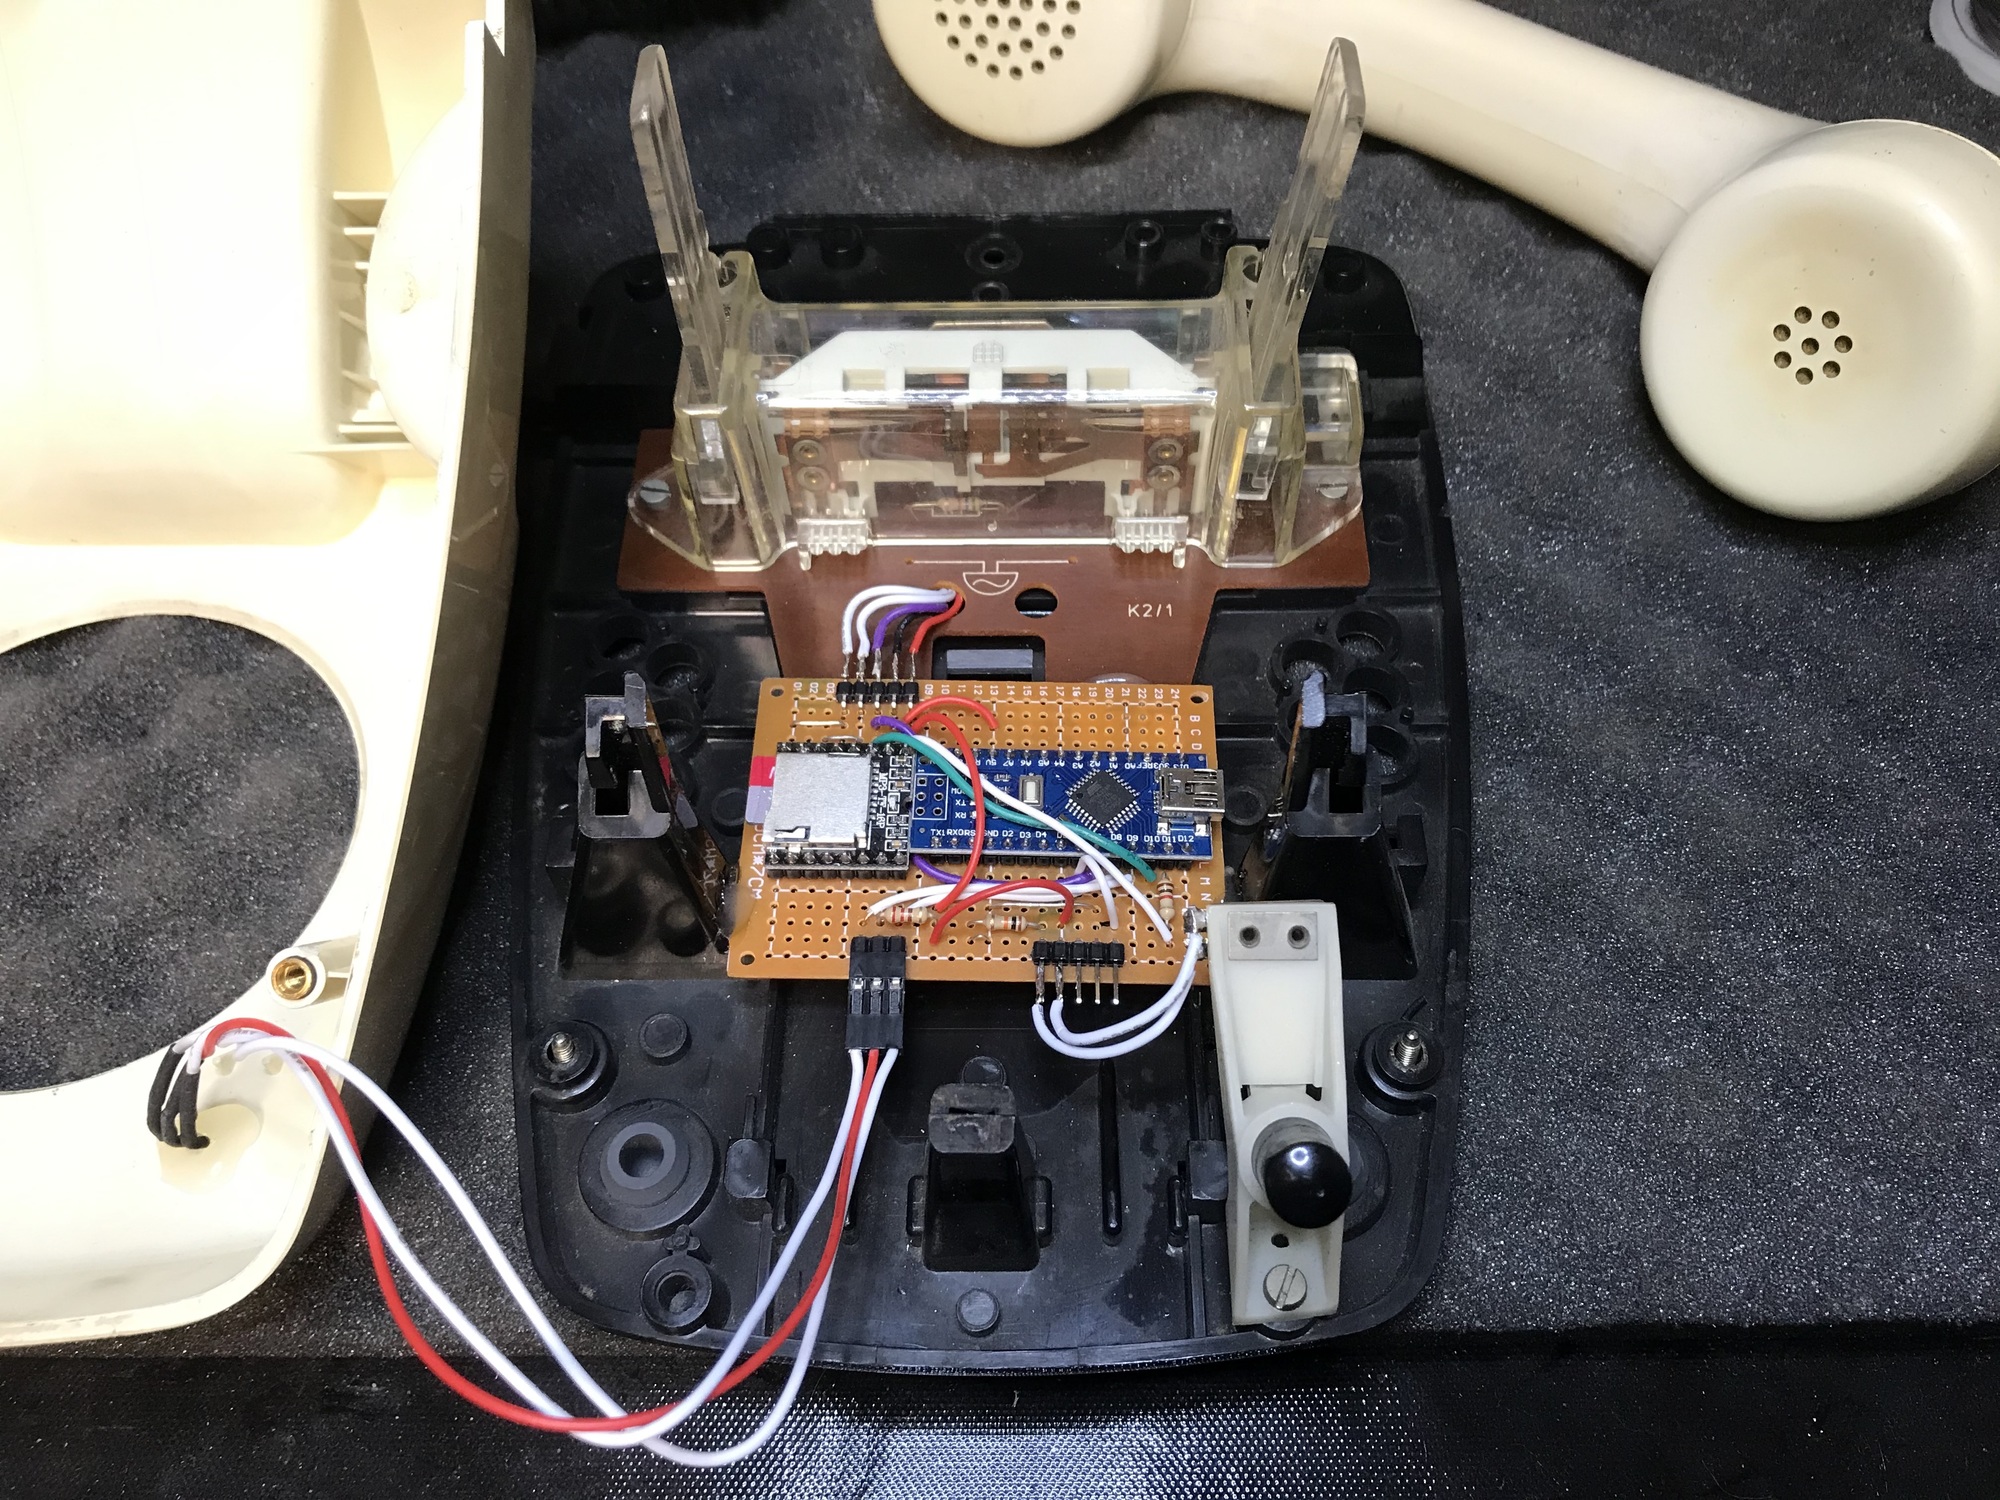
After I had converted T65s for a few acquaintances, I received an unknown retro looking dial telephone. This wasn't a genuine vintage phone at all, but a state-of-the-art remake of an old British General Post Office (GPO) telephone. This phone may look old-fashioned, but it is basically an ultra-modern counterfeit vintage GPO746 phone. Such a telephone is fairly easy to recognize by the fact that the more modern '*' and '#' of the push-button telephones have also been given a place on the dial. Anyone looking on the internet will soon notice that these phones are widely offered. My copy turned out to be only a few years old. Obviously it was a nice challenge to turn this into a 'Nostalphone' as well.
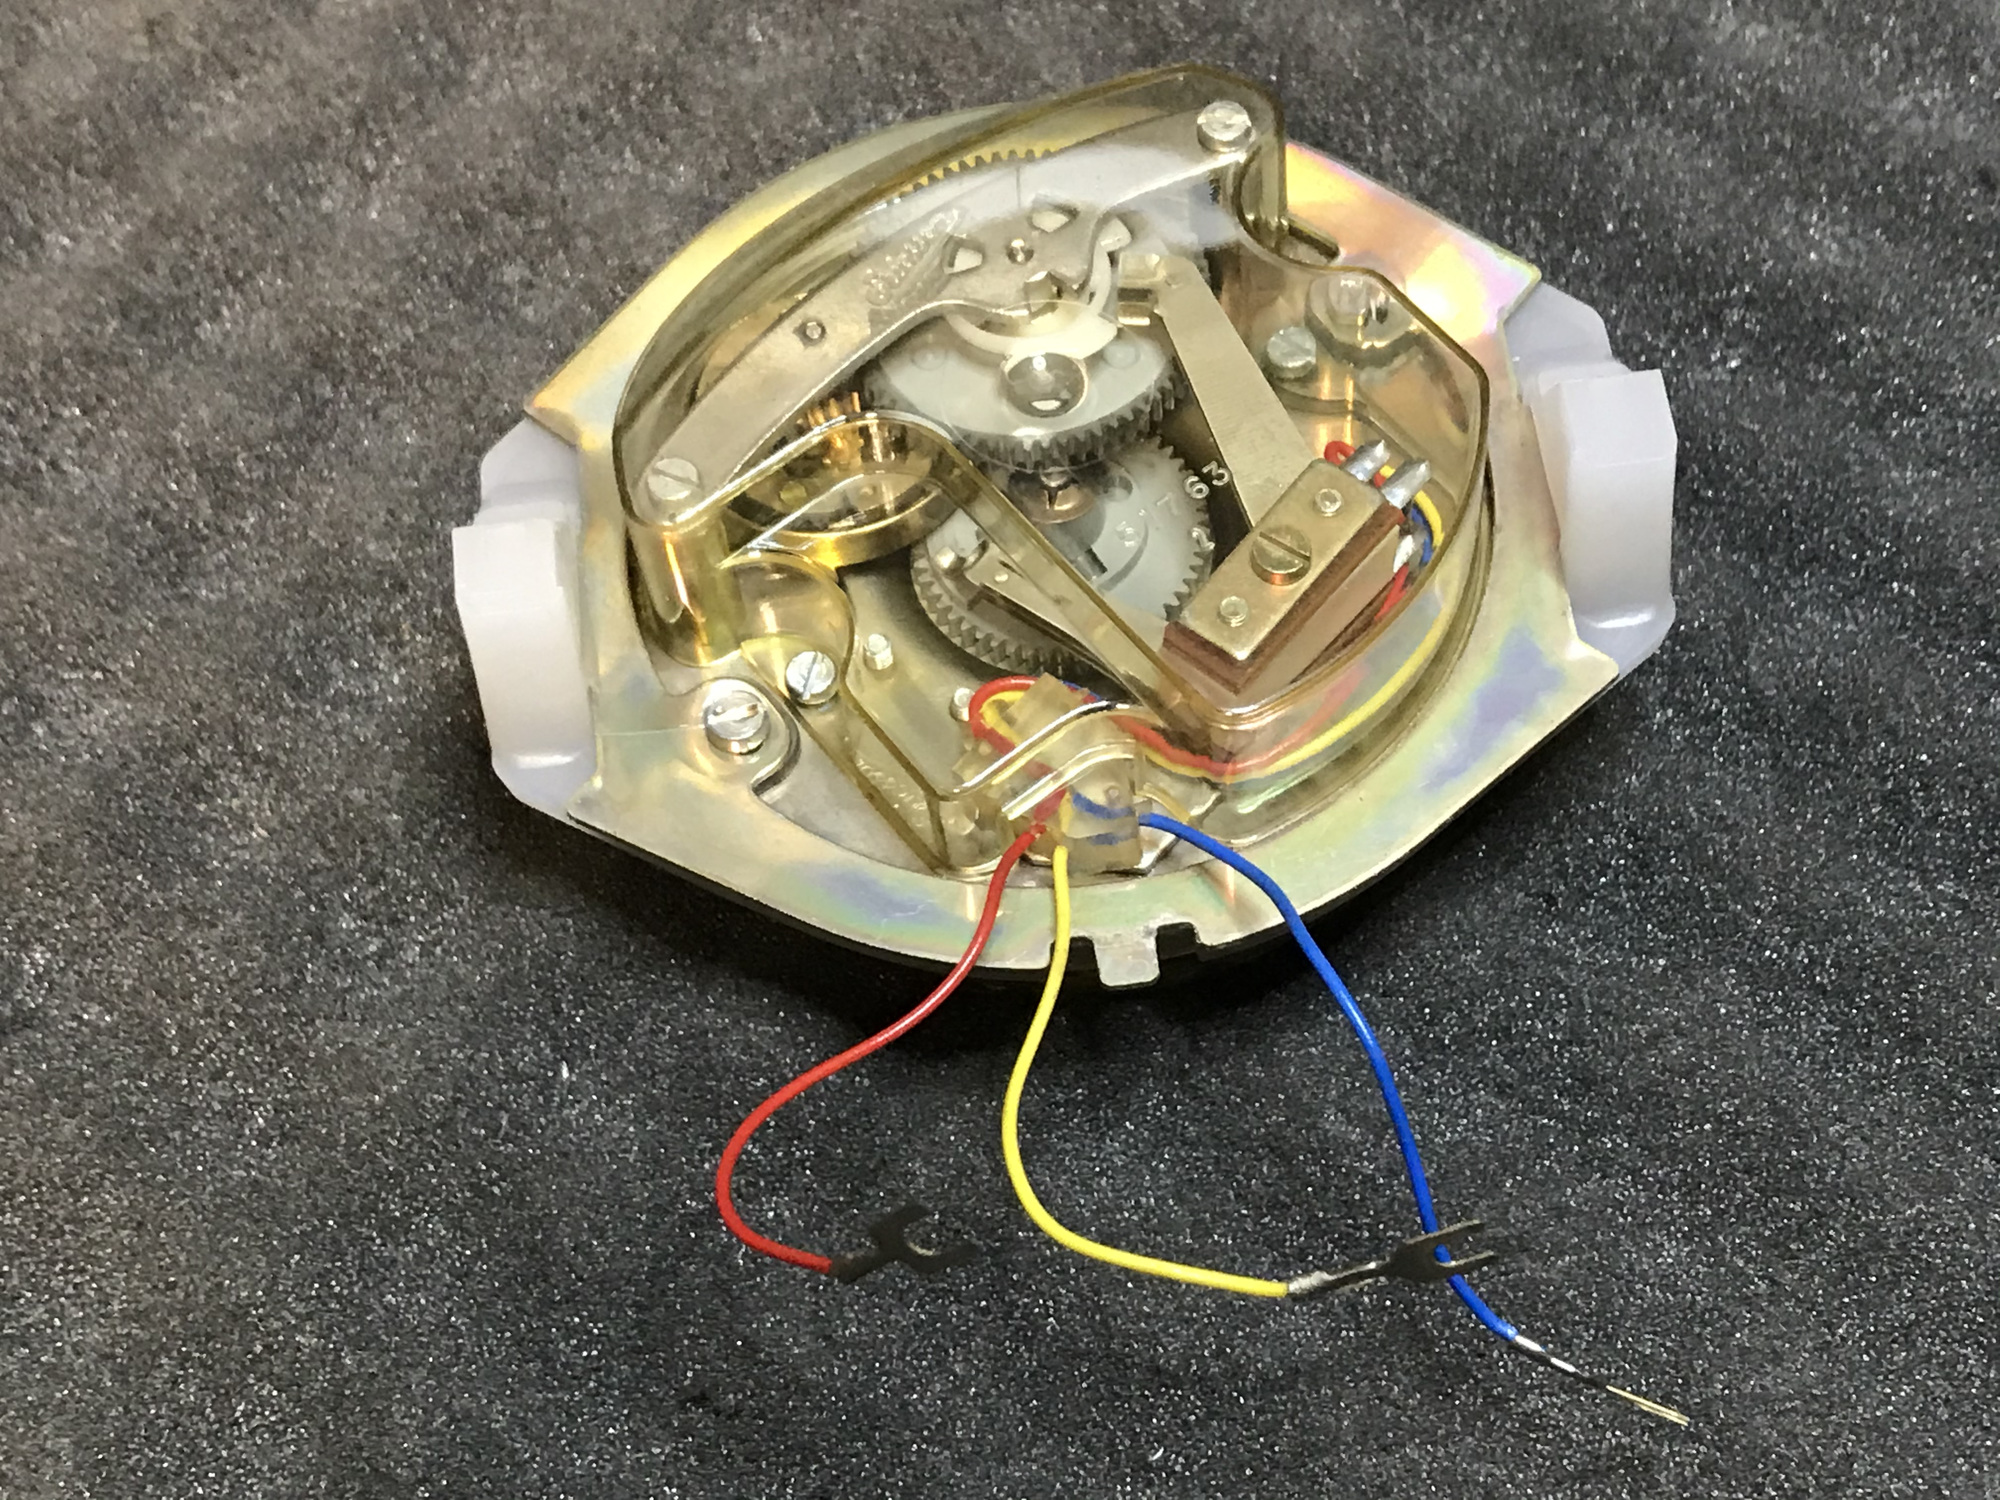
The pulse scanner that I programmed for the T65 does not work here because this fake retro model phone uses a completely different rotary dial technology. When spinning, a disc with a hole moves above a series of twelve LDRs (photosensitive resistors). The 'stop' that you hit with your finger contains a switch that lights up two LEDs. The LDR illuminated at that moment has a lower resistance value due to the incident light, so that the dialed number can be decoded during a scan.
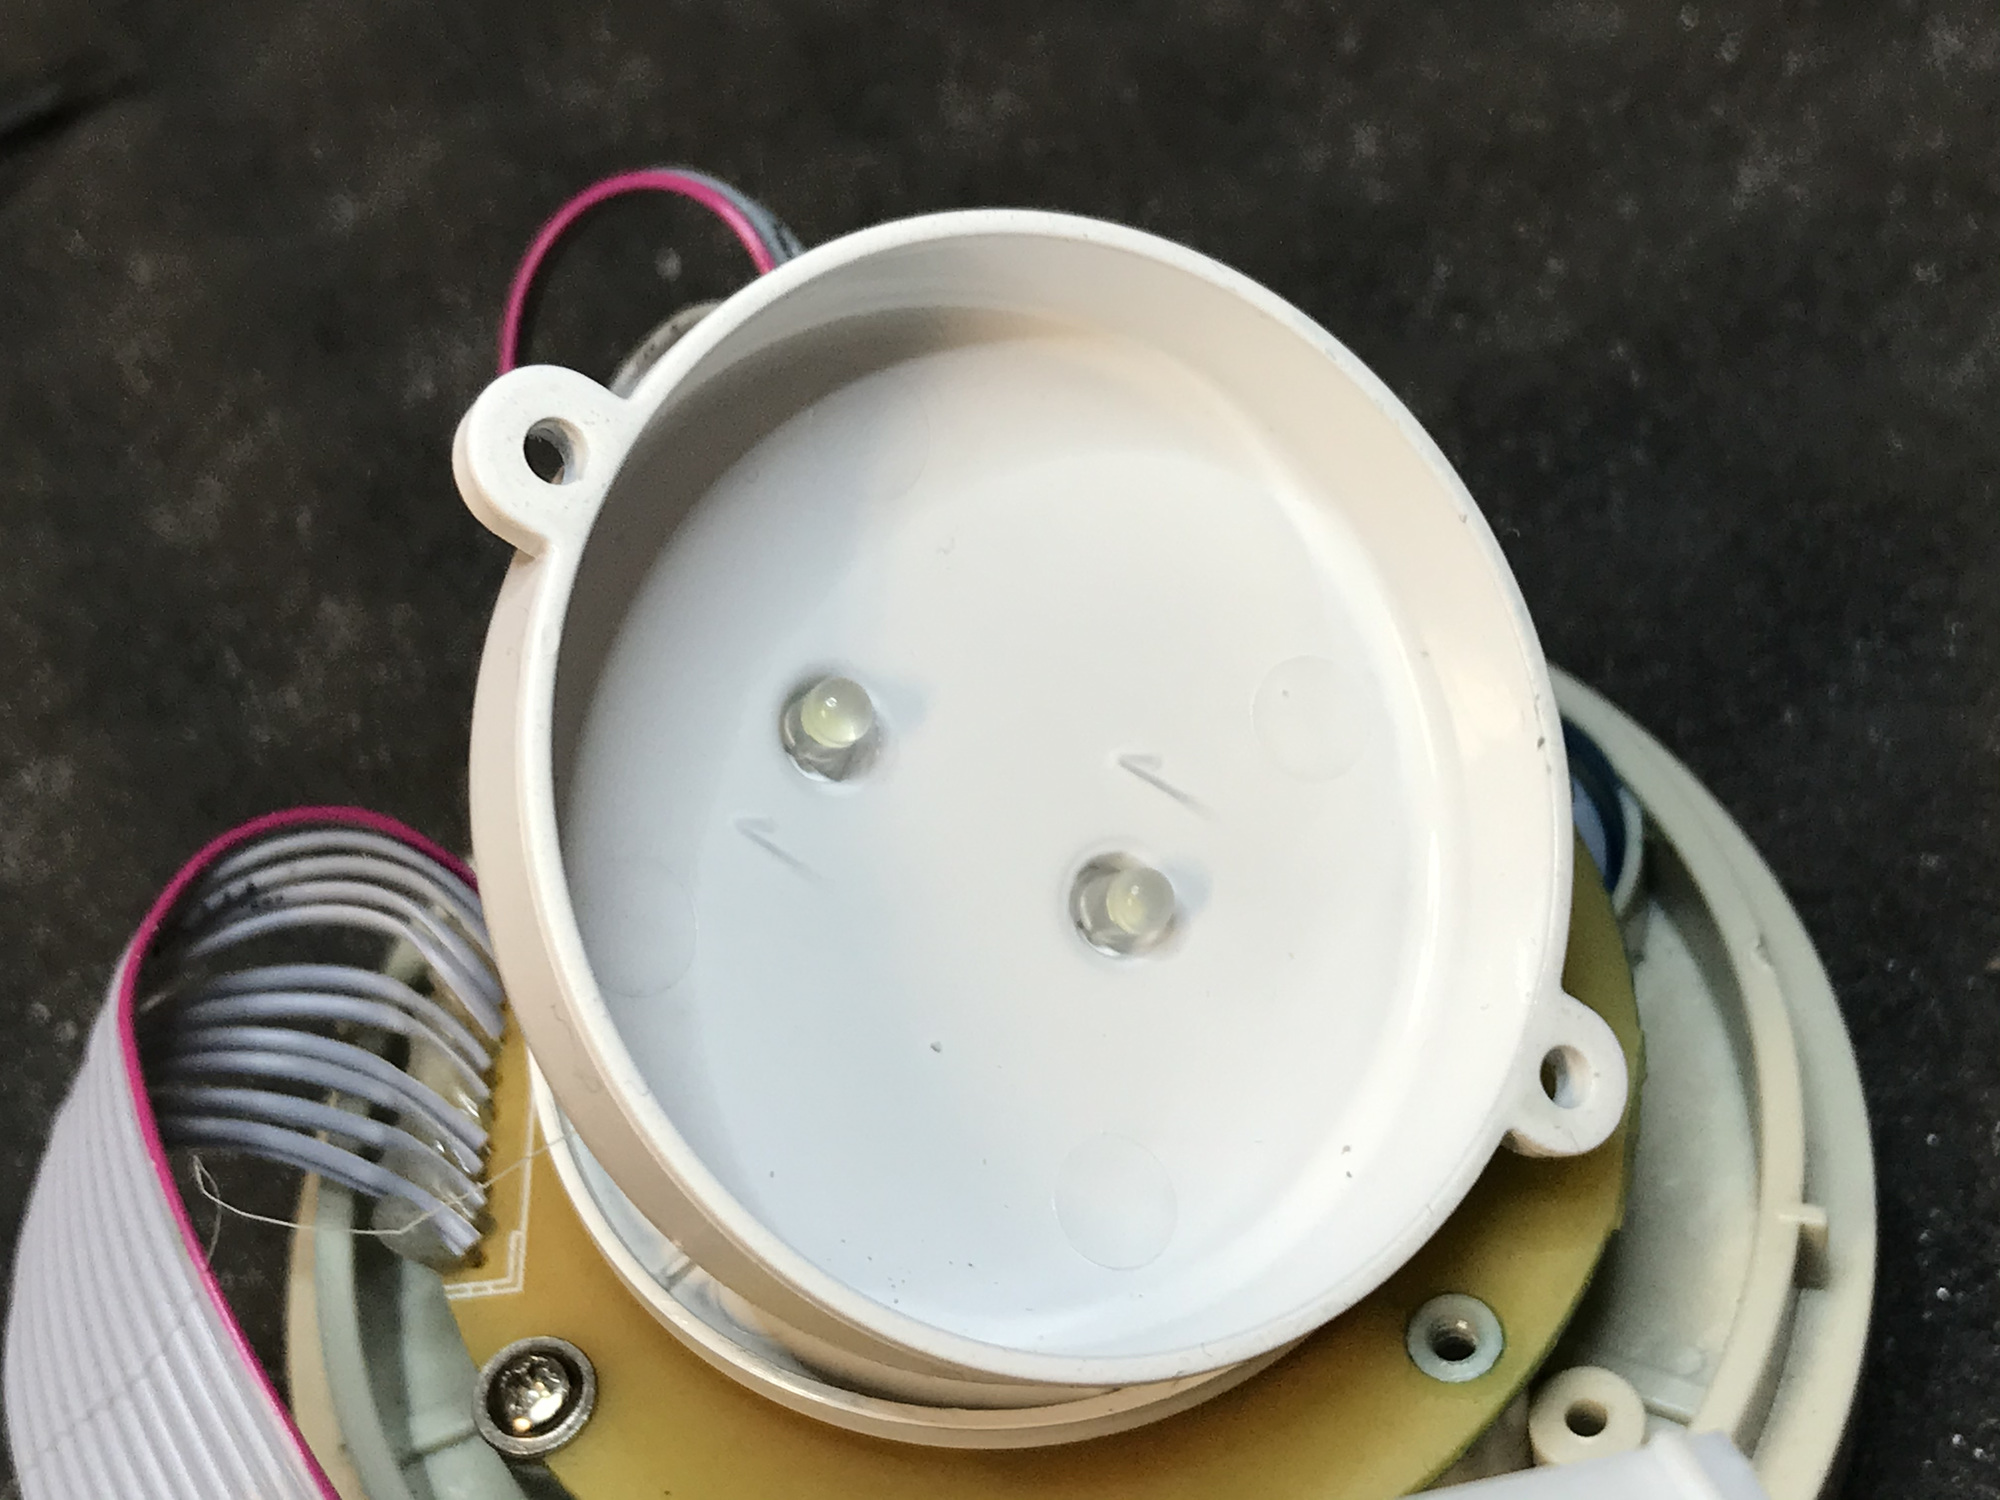
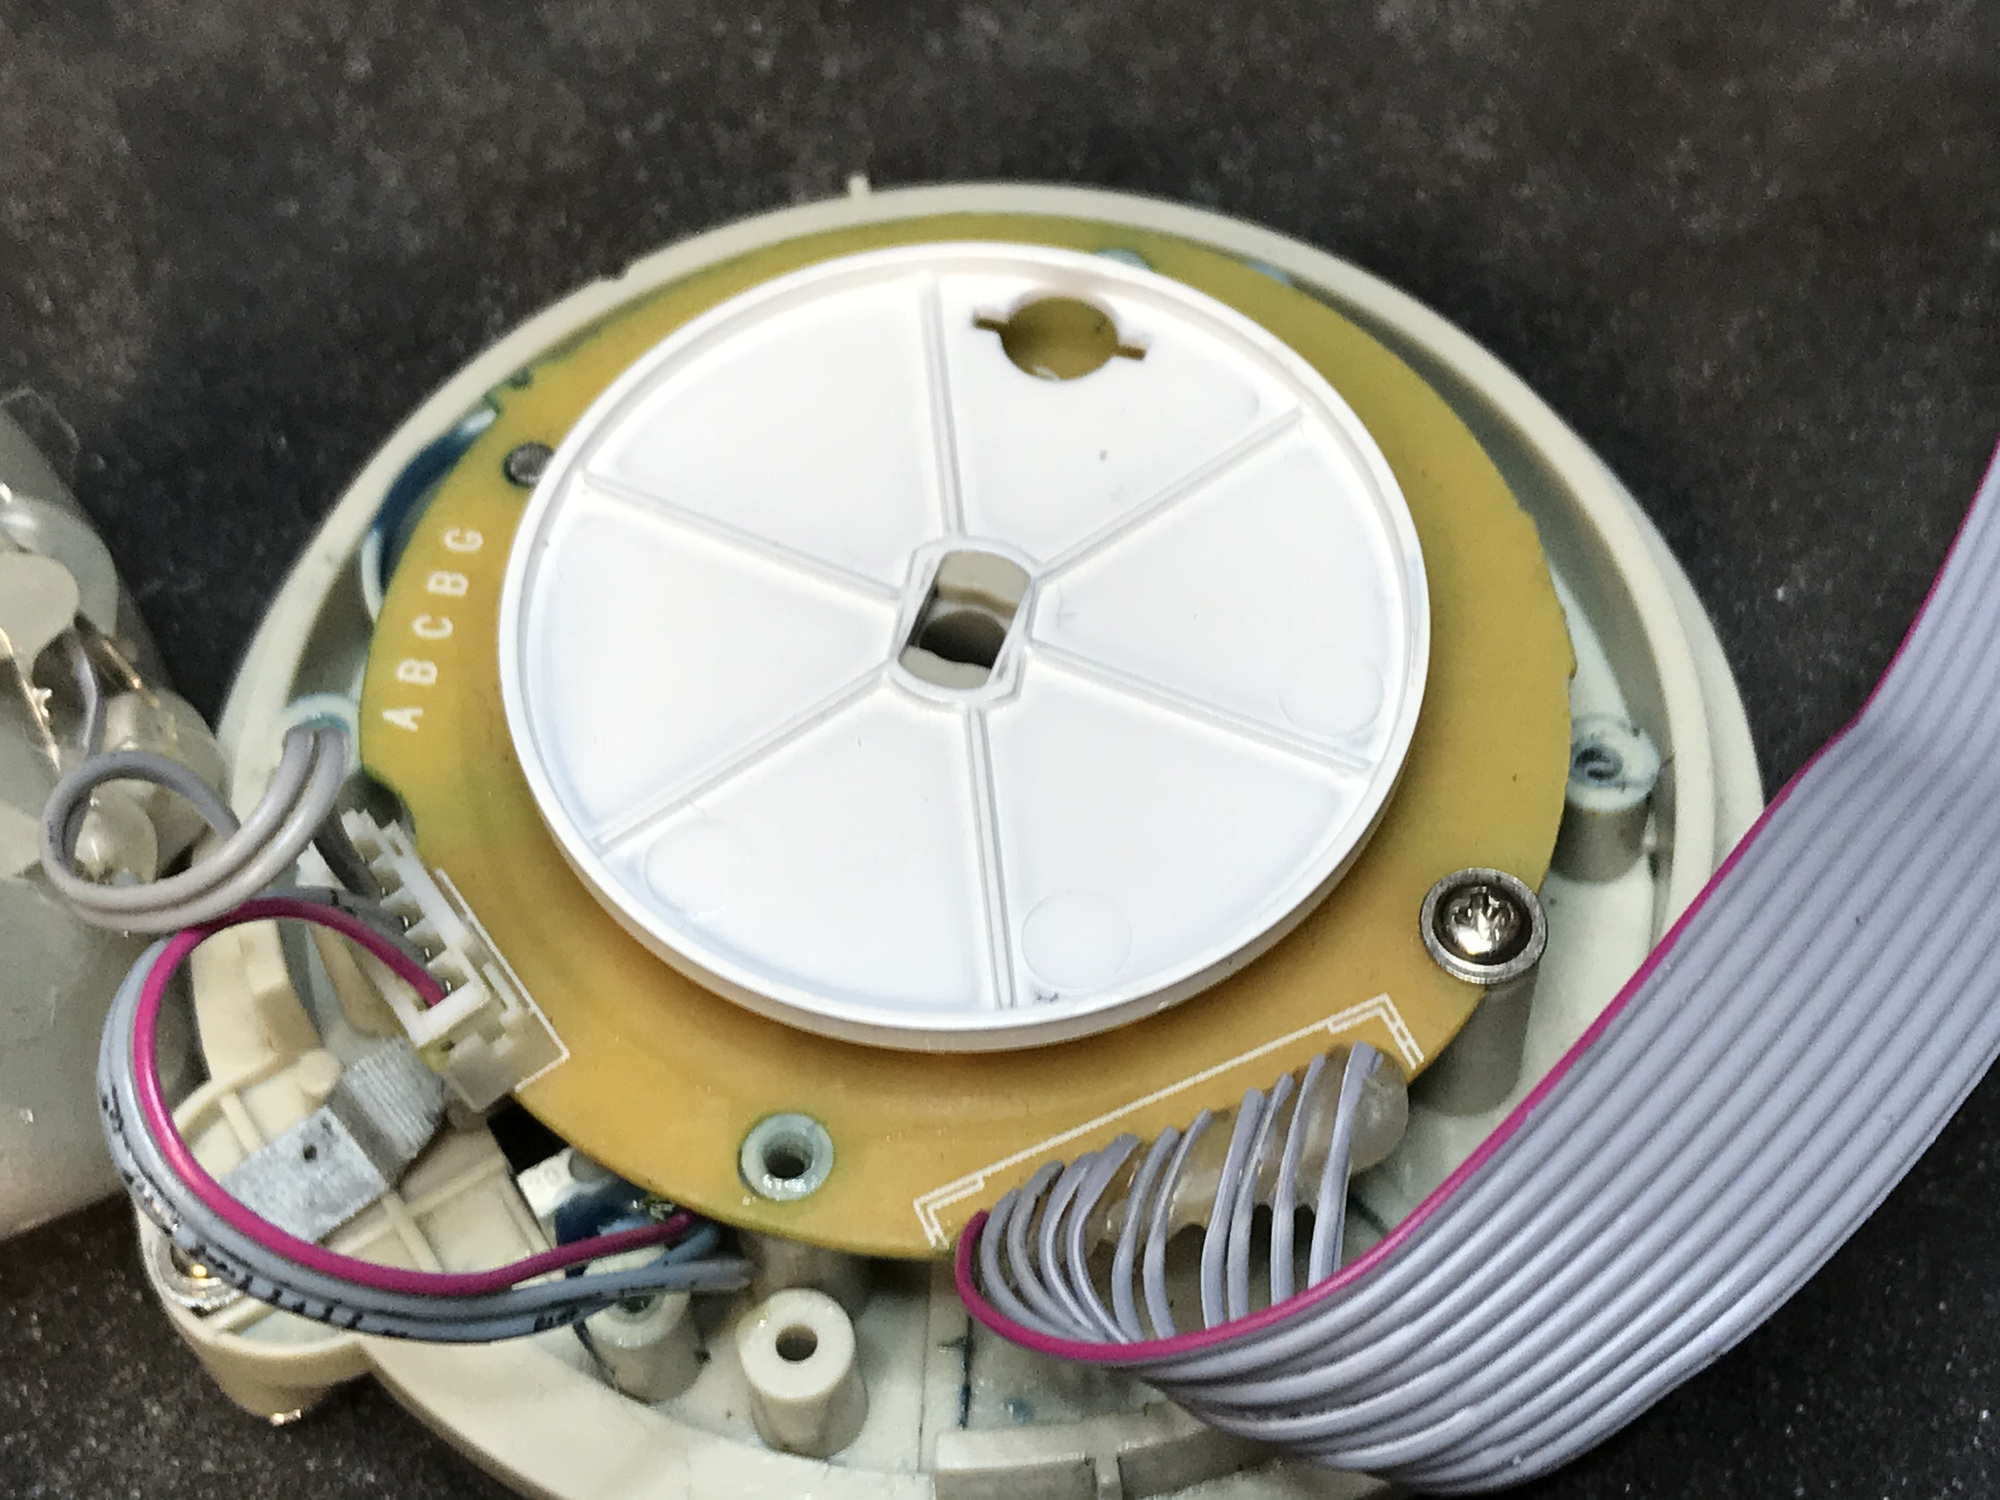
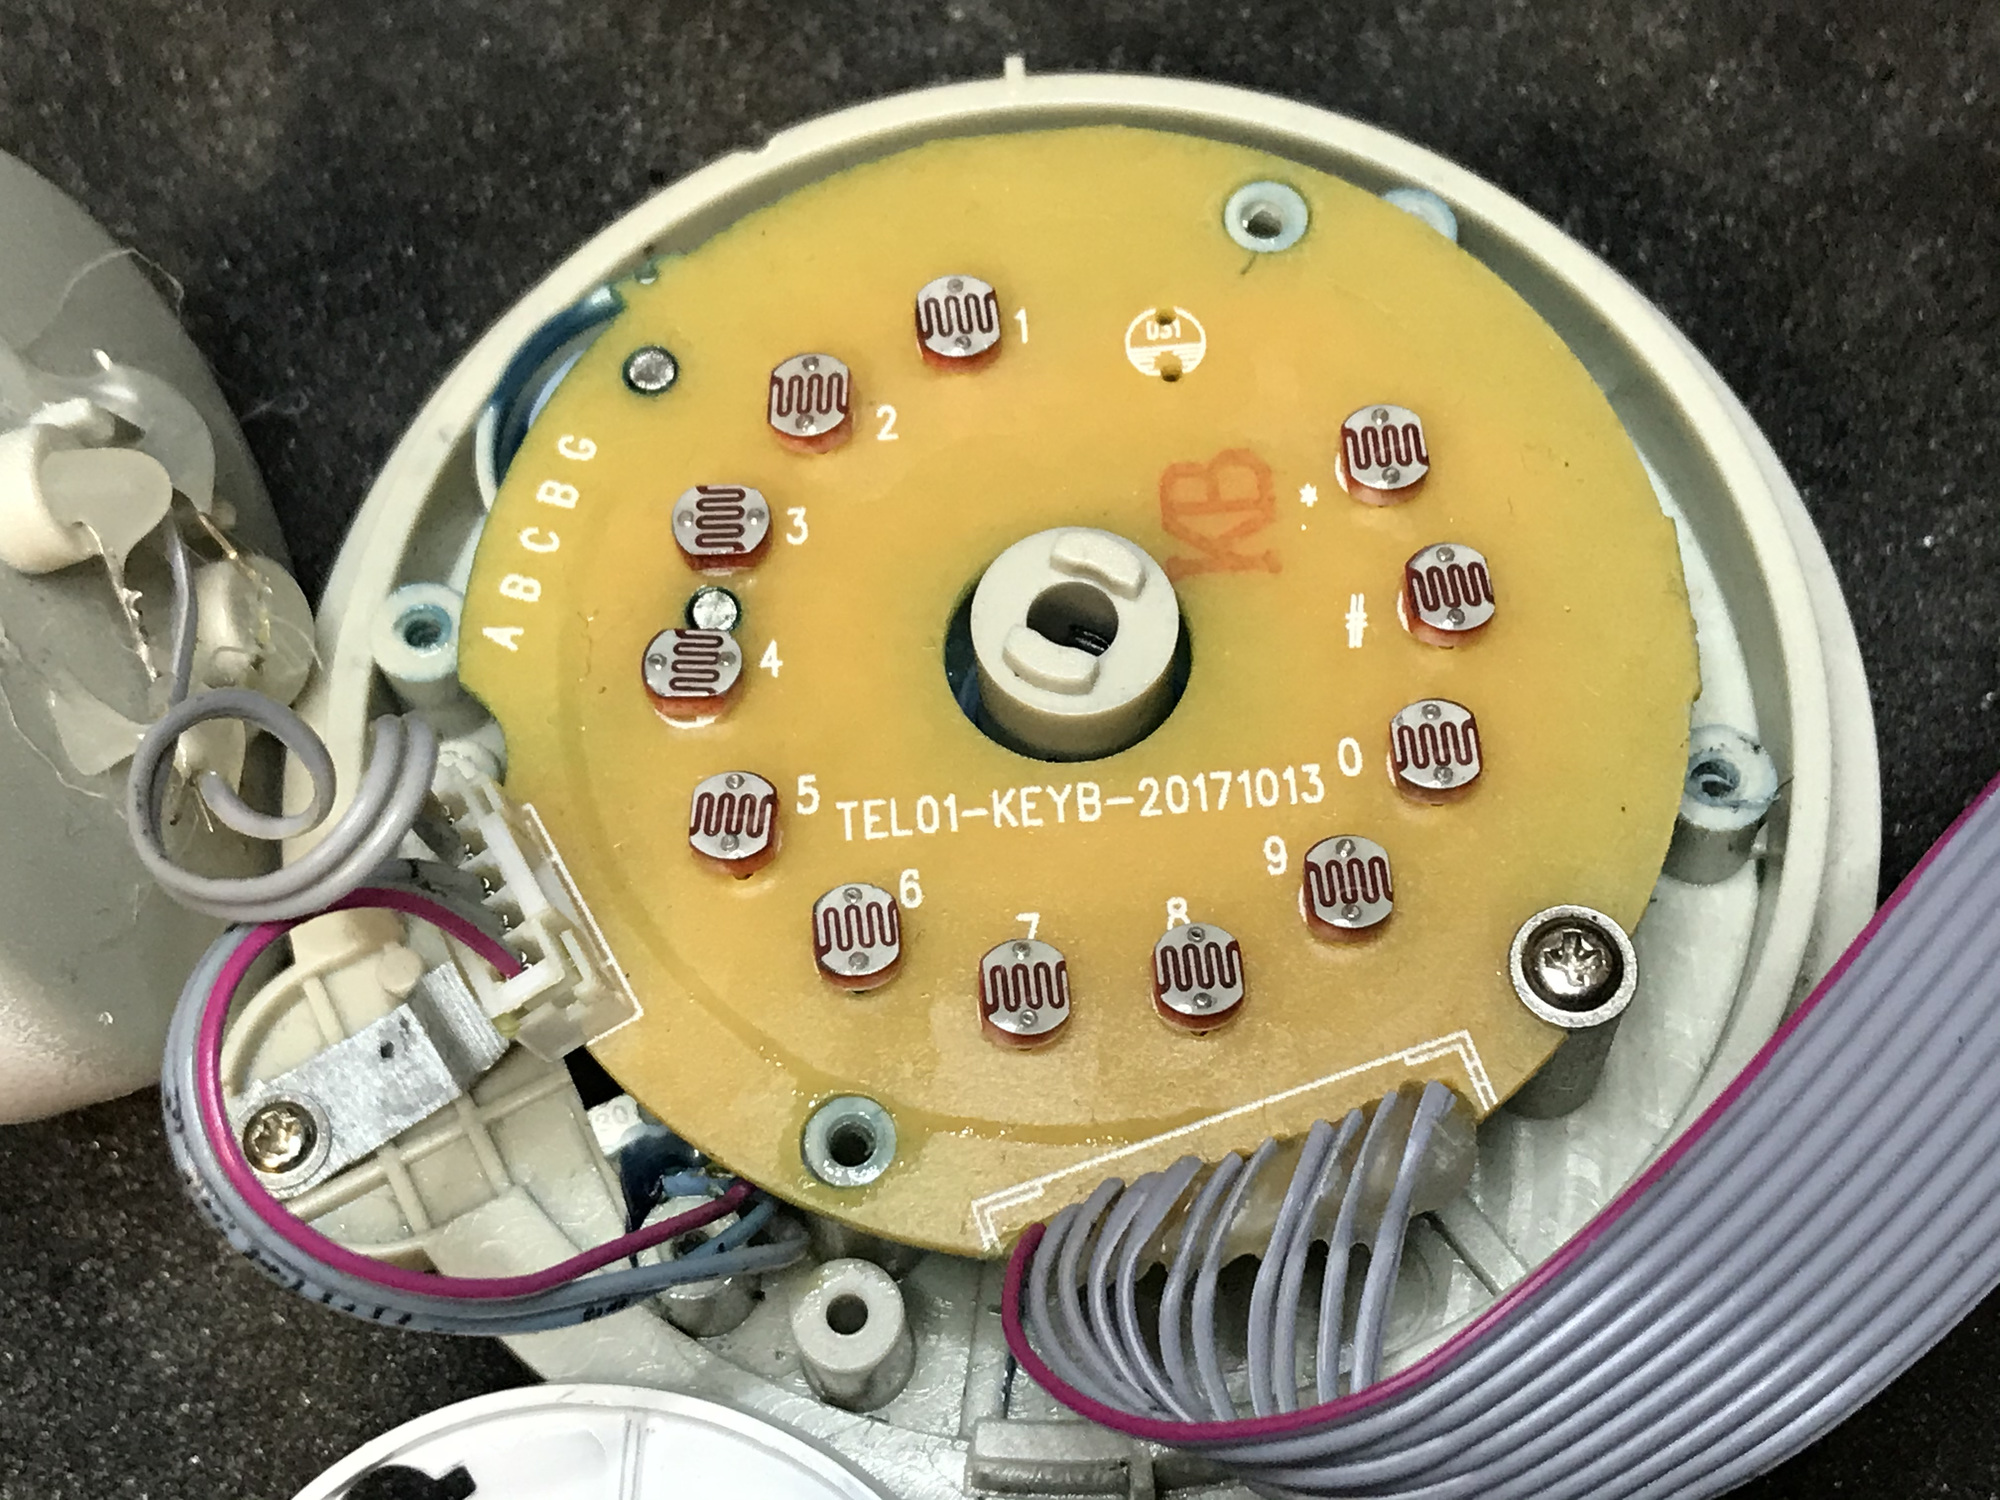
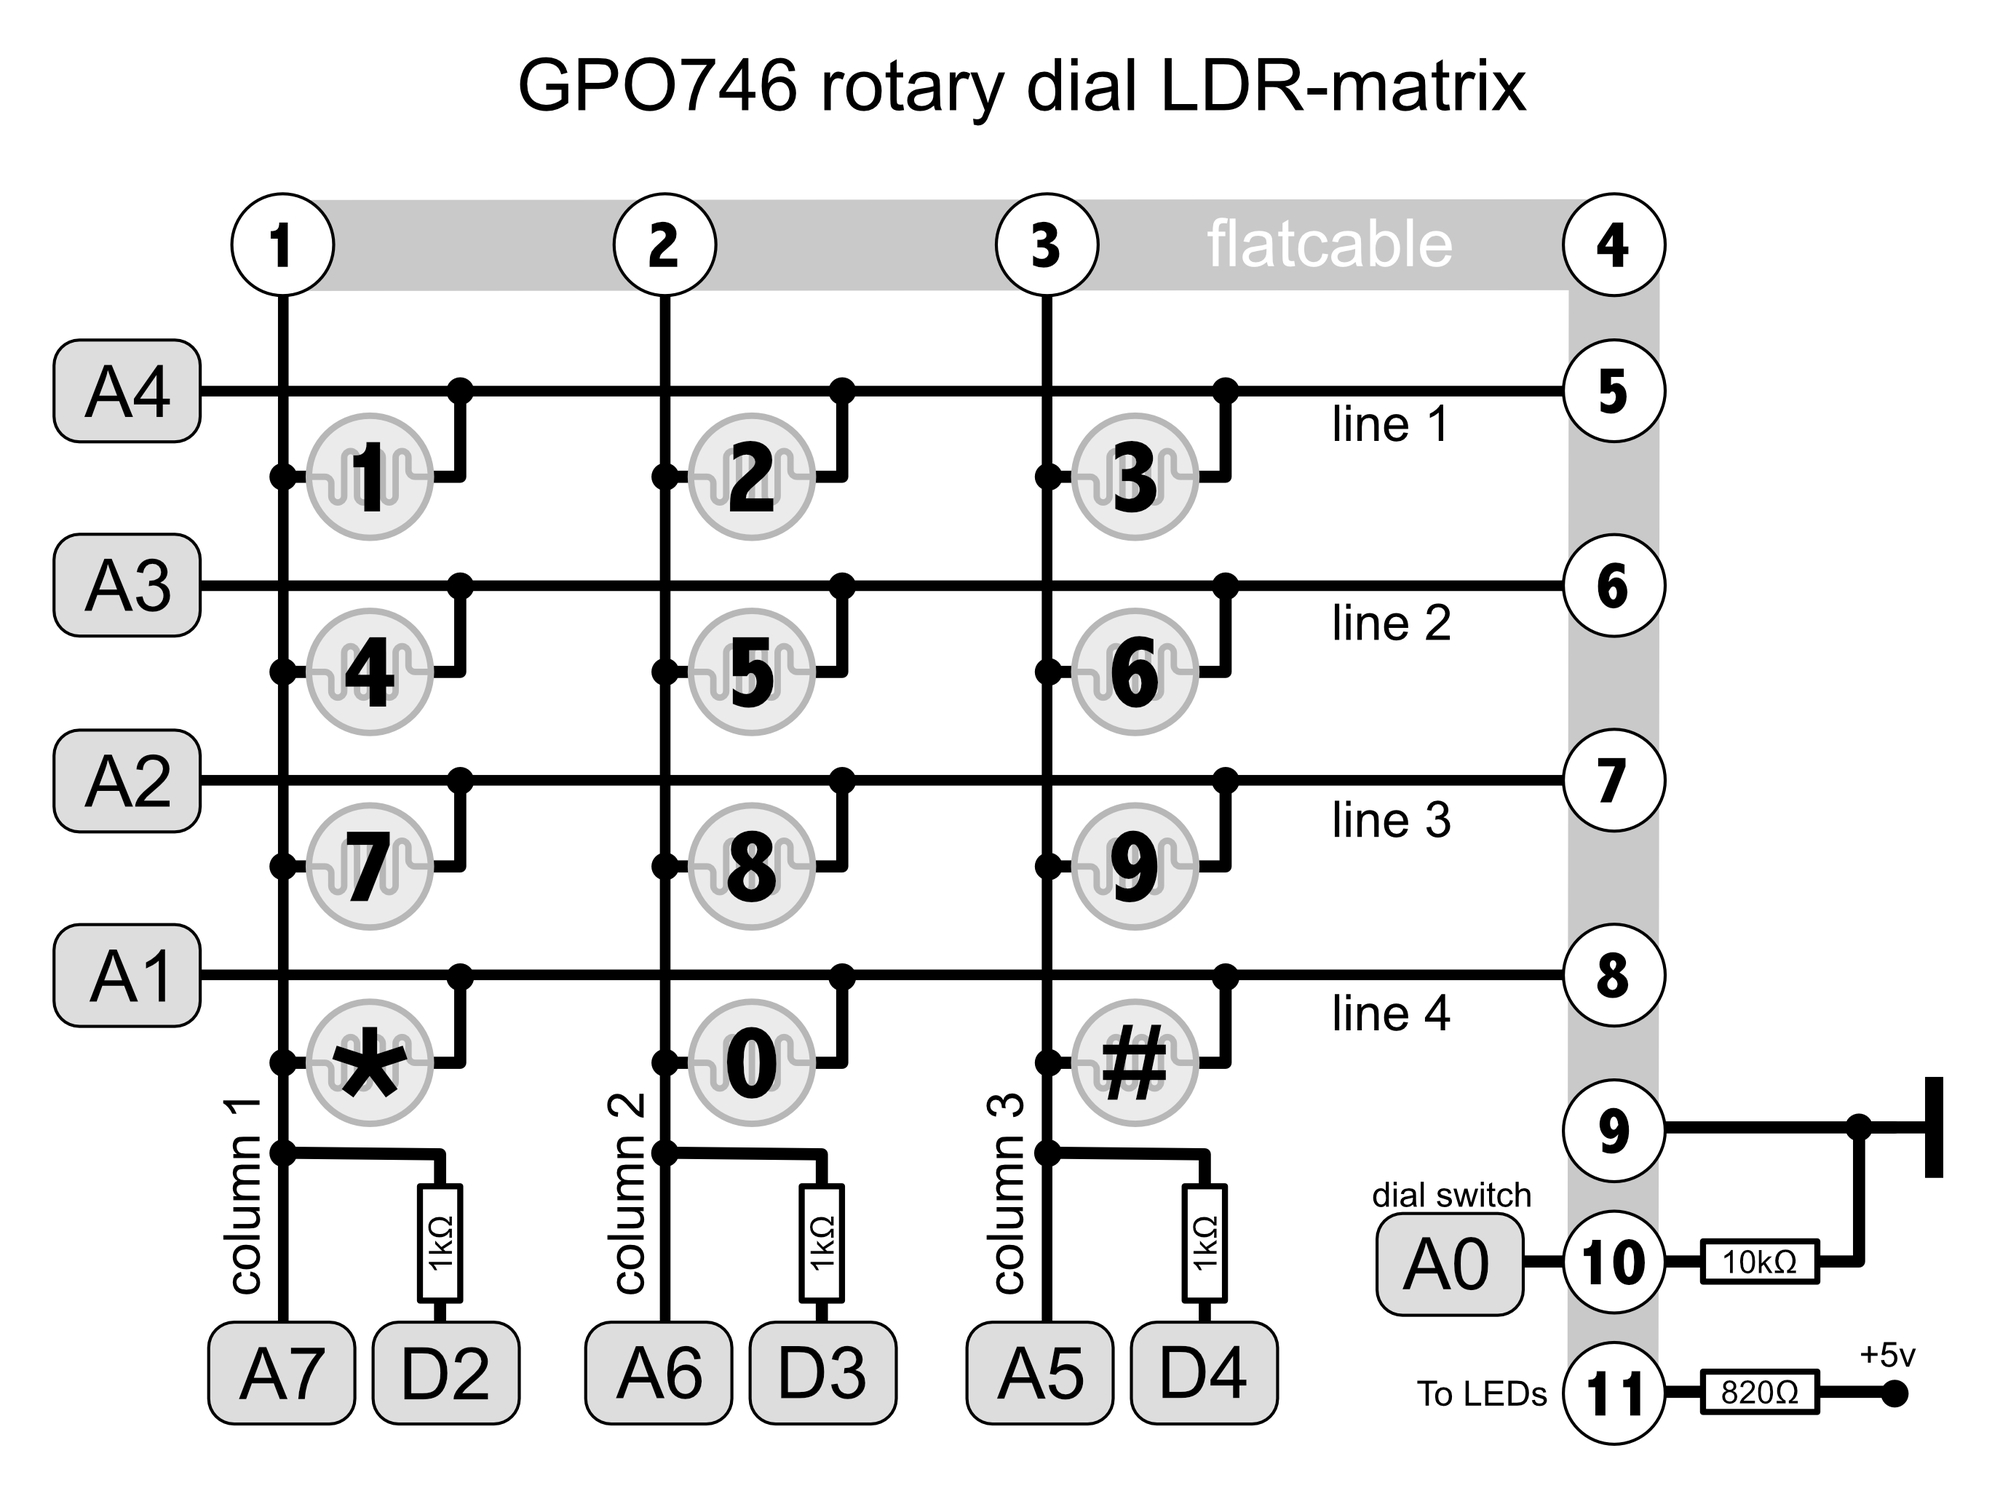
The resistance of the LDR on the node then determines the voltage value to be measured on the analog inputs at the center of the voltage divider that the LDR makes with the relevant 1kΩ resistor to ground. After all, if an LDR is not illuminated, it is relatively high-ohmic. If LED light shines on it (if this number has been dialed), the resistance drops drastically, causing the voltage to be measured to rise. We can detect this in the software during the scan. It is cumbersome and requires a lot more inputs than a pulse dial of the T65, but it actually went well immediately and turns out to be quite reliable.
Reading such a rotary dial requires a completely different approach. The Sketch on the right shows the code. The end-switch triggers a scan of the entire matrix and thus a readout of all twelve voltage divider (LDR) values. The LED lit LDR (the dialed number) can be detected as a higher measured analog voltage at the affected node during the scan.
Since the detection in this model dial does not rely on counting pulses during the walk back of the dial, but is instantly determined at the furthest rotation angle of the dial, a slightly longer timeout for the dial to roll back and a possible follow-up number may be dialed had to be set. Otherwise it would not be possible to read longer number ranges ('telephone numbers'). I programmed it, just like with the T65 above, in such a way that the first played number determines the 'bank' (with ten files each), and the last number dialed the sound file within this bank. If you dial only one number, this song comes from bank 1.
Since this phone does not have an extra button under the dial, I chose to have the '#' and the '*' (and a simple click of the dial-end button without rotating the dial) function as the random-song button.
// Whizzbizz.com - Arnoud van Delden - Easter/april 2021 (for 'aunt Kitty')
//
// Nostalphone Sketch for the GPO 746 retro replica rotary dial phone. Waits for hook switch and reads dialed number from the rotary dial by scanning the LDR matrix
// The 'flash'-button on the T65 is used to make a direct random selection from all samples, otherwise the first (or only) number
// determines the subdir/bank to be used (each bank has 10 WAVs) and the last number dialed the WAV within this subdirectory/bank.
// Samples are played through DFPlayer (Mini MP3 Player) controlled over SoftwareSerial with RX=10 and TX=11
//
// Expects a SD-card with the correct directory structure of ten banks/subdirs of ten WAVs each
// The bank/subdir 0/ contains the sounds that are played when only one number was dialed
// Otherwise first number is the bank/subdir, last number dialed the sound that is to be played...
// First WAV on SD is played as dial tone, so provide a WAV-file starting with '00' (e.g. '00 Kiestoon350Hz.wav') in the root of the SD card
//
#include "SoftwareSerial.h"
#include "DFRobotDFPlayerMini.h"

#define SD_ChipSelectPin 10
#define BlinkTime 25000  // Speed of blinking LED during dial phase when receiver is picked up
#define seq_timeout 4000 // Time out before the number dial phase is considered done
#define input_hook  7  // Pin hook switch connected to (purple)
#define led_green   5  // Green LED: lit on power on, flashes when dialing
#define led_red     6  // Red LED: lit when music is played
#define dial_switch A0 // End of dial rotation reached

// Scan trigger (LEDs lighting, end of dial) = A0 - Negative logic, low active!
int dial_columns[] = {A7, A6, A5};   // Intersection analogue read during scan
int scan_lines[] = {A4, A3, A2, A1}; // Analogs used as OUTPUT. Normal=LOW, during scan read one is HIGH
int scan_columns[] = {2, 3, 4};      // Digitals used as OUTPUT. Normal=LOW, during scan read column is LOW
int matrix_read;
int scan_column;
int scan_line;
int dialed;

unsigned long debounce_time_hook  = 0;       // Debounce time for hook switch...
unsigned long debounce_time_dial_switch = 0; // Debounce time end-of-rotary-dial switch...
unsigned long dialing_timeout = 0;           // To keep track of dialing time out...
unsigned long debounceDelay = 50;            // Global debounce time...

bool logging = false; // Serial logging during development...
bool hook_up = false;
bool dialing = false;
bool process_number = false;
bool number_detected = false;

int hook_state;
int pulse_state;
int rand_state;
int last_hook_state = LOW;
int last_dialing_state = HIGH;
int last_io_state_pulse = HIGH;
int last_number_dialed = 0;
int nrs_dialed = 0;
int blink_count = 0; // For the blinking LED...

int io_state_pulse;
int hook_switch_state;

int dial_state;
int dial_switch_state = HIGH;
int last_dial_switch_state = HIGH;

int bank_nr = 0;

SoftwareSerial mySoftwareSerial(10, 11); // RX, TX
DFRobotDFPlayerMini myDFPlayer;
void printDetail(uint8_t type, int value);

void setup() {
  mySoftwareSerial.begin(9600);
  Serial.begin(38400);

  pinMode(input_hook, INPUT_PULLUP);
  pinMode(led_red, OUTPUT);
  pinMode(led_green, OUTPUT);
  // Scan trigger (LEDs lighting) = A0
  pinMode(dial_switch, INPUT); // Low active, negative logic...

  // Lines to scan...
  for (scan_line=0; scan_line<4; scan_line++) {
    pinMode(scan_lines[scan_line], OUTPUT);
    analogWrite(scan_lines[scan_line], 0);
  }

  // Columns to scan...
  for (scan_column=0; scan_column<3; scan_column++) {
    pinMode(scan_columns[scan_column], OUTPUT);
    digitalWrite(scan_columns[scan_column], LOW);
  }

  // Dial matrix LDR intersection point analogue INPUT columns A1, A2 and A3
  for (scan_column=0; scan_column<3; scan_column++) {
    pinMode(dial_columns[scan_column], INPUT);
  }

  logSerial("Nostalphone v1.3");
  logSerial("Initializing DFPlayer...");
  if (!myDFPlayer.begin(mySoftwareSerial)) {  //Use softwareSerial to communicate with mp3.
    logSerial("Unable to begin:");
    logSerial("1.Please recheck the connection!");
    logSerial("2.Please insert the SD card!");
    while(true);
  }
  logSerial("DFPlayer Mini connected");

  myDFPlayer.setTimeOut(500); //Set serial communictaion time out 500ms

  //----Set volume----
  myDFPlayer.volume(15);  //Set volume value (0~30).
  myDFPlayer.volumeUp(); //Volume Up
  myDFPlayer.volumeDown(); //Volume Down
  myDFPlayer.EQ(DFPLAYER_EQ_NORMAL);
  myDFPlayer.outputDevice(DFPLAYER_DEVICE_SD);

  if (0) { // Debug diagnostics only: dumps nr of files in each subfolder of the SD card
    Serial.print("1 nr files = ");
    Serial.println(myDFPlayer.readFileCountsInFolder(1));
    Serial.print("2 nr files = ");
    Serial.println(myDFPlayer.readFileCountsInFolder(2));
    Serial.print("3 nr files = ");
    Serial.println(myDFPlayer.readFileCountsInFolder(3));
    Serial.print("4 nr files = ");
    Serial.println(myDFPlayer.readFileCountsInFolder(4));
    Serial.print("5 nr files = ");
    Serial.println(myDFPlayer.readFileCountsInFolder(5));
    Serial.print("6 nr files = ");
    Serial.println(myDFPlayer.readFileCountsInFolder(6));
    Serial.print("7 nr files = ");
    Serial.println(myDFPlayer.readFileCountsInFolder(7));
    Serial.print("8 nr files = ");
    Serial.println(myDFPlayer.readFileCountsInFolder(8));
    Serial.print("9 nr files = ");
    Serial.println(myDFPlayer.readFileCountsInFolder(9));
    Serial.print("10 nr files = ");
    Serial.println(myDFPlayer.readFileCountsInFolder(10));
  }

  digitalWrite(led_green, LOW);  // turn the green LED on on power on...
  logSerial("Setup done...");
}

void logSerial(String message) {
  // Handled overhere so logging to serial can easily be switched off...
  if (logging) Serial.println(message);
  return;
}

void loop() {
  // Read hook state...
  hook_switch_state = digitalRead(input_hook);
  if (hook_switch_state != last_hook_state) {
    debounce_time_hook = millis();
  }
  if ((millis() - debounce_time_hook) > debounceDelay) {
    if (hook_switch_state != hook_state) {
      hook_state = hook_switch_state;
      if (hook_state == LOW) {
        logSerial("Receiver was picked up. Please dial a number...");
        hook_up = true;
        dialing = false;
        bank_nr = -1;
        nrs_dialed = 0;
        // Output dial tone...
        myDFPlayer.play(1);
      } else {
        logSerial("Receiver is put back. Thanx for using the Nostalphone!");
        hook_up = false;
        myDFPlayer.stop(); // End dial tone...
        digitalWrite(led_green, LOW);  // turn the green LED on on power on...
        digitalWrite(led_red, HIGH);   // turn the red LED off (HIGH=off)
      }
    }
  }
  last_hook_state = hook_switch_state;

  if (hook_up) { // Dial sequence...
    if ((hook_up || dialing) && digitalRead(led_red)) {
      if (blink_count > BlinkTime) { // Blink LED...
        // Toggle blink...
        digitalWrite(led_green, !digitalRead(led_green));  // Toggle the green LED...
        blink_count = 0;
      }
      blink_count++;
    }

    // Be triggered by the end-of-dial switch. Read dial state...
    int dial_switch_state = digitalRead(dial_switch);
    if (dial_switch_state != last_dial_switch_state) {
      debounce_time_dial_switch = millis();
    }
    if ((millis() - debounce_time_dial_switch) > debounceDelay) {
      if (dial_switch_state != dial_state) {
        dial_state = dial_switch_state;
        if (dial_state==LOW) {
          logSerial("Something dialed...");
          if (!dialing) {
            number_detected = false;
            nrs_dialed = 0;
            last_number_dialed = bank_nr = -1;
            myDFPlayer.stop(); // End dial tone...
          }
          dialing = true;
          digitalWrite(led_red, HIGH);   // turn the red LED off (HIGH=off)
          dialing_timeout = millis(); // Keep resetting timer during dialing...

          // Default whole matrix lines to LOW, cols to HIGH...
          for (scan_line=0; scan_line<4; scan_line++)
            analogWrite(scan_lines[scan_line], 0);
          for (scan_column=0; scan_column<3; scan_column++)
            digitalWrite(scan_columns[scan_column], HIGH);

          // Start matrix scan phase...
          dialed = -1;
          for (scan_line=0; scan_line<4; scan_line++) {
            analogWrite(scan_lines[scan_line], 255);
            for (scan_column=0; scan_column<3; scan_column++) {
              digitalWrite(scan_columns[scan_column], LOW); // Active: pull low
              delay(10);
              // Now read this intersection...
              matrix_read = analogRead(dial_columns[scan_column]);
              digitalWrite(scan_columns[scan_column], HIGH); // Inactive: pull same level as scan-line
              if (matrix_read>100) {
                dialed = (scan_line*3)+(scan_column+1);
                break;
              }
            }
            analogWrite(scan_lines[scan_line], 0);
          }
          if (dialed >= 0) {
            nrs_dialed++;
            last_number_dialed = dialed;
            if (nrs_dialed==1 && bank_nr<0)
              bank_nr = dialed;
            logSerial((String)nrs_dialed+" - dialed: "+(String)dialed);
          }
        }
      }
    }
    last_dial_switch_state = dial_switch_state;

    if (dialing && ((millis() - dialing_timeout) > seq_timeout)) {
      // Dial time out reached...
      logSerial("Dialing finished ");
      process_number = true;
      dialing = false;
    }

    if (process_number) {
      if (last_number_dialed==11) { // 10=*, 11=0, 12=#
        last_number_dialed = 10; // Remap '0' to song 10
      } else {
        if (last_number_dialed>=10 || last_number_dialed<0) {
          bank_nr = random(9)+1;
          last_number_dialed = random(9)+1;
        } else {
         if (nrs_dialed==1) // Only one non-wildcard number dialed: use default bank 1...
           bank_nr = 1;
        }
      }
      if (bank_nr>10) bank_nr = 1;

      // Play WAV....
      logSerial("bank_nr "+(String)bank_nr+" song "+(String)last_number_dialed);
      digitalWrite(led_green, HIGH); // Power off green LED...
      digitalWrite(led_red, LOW);    // Turn the red LED on (HIGH=off)

      process_number = false;
      if (myDFPlayer.available()) {
        printDetail(myDFPlayer.readType(), myDFPlayer.read()); //Print the detail message from DFPlayer to handle different errors and states.
      }
      myDFPlayer.playFolder(bank_nr, last_number_dialed); // Play the song...
    }

  } // End hook_up...
}

void printDetail(uint8_t type, int value) {
  switch (type) {
    case TimeOut:
      logSerial("DFPlayer: Time Out!");
      break;
    case WrongStack:
      logSerial("DFPlayer: Stack Wrong!");
      break;
    case DFPlayerCardInserted:
      logSerial("DFPlayer: Card Inserted!");
      break;
    case DFPlayerCardRemoved:
      logSerial("DFPlayer: Card Removed!");
      break;
    case DFPlayerCardOnline:
      logSerial("DFPlayer: Card Online!");
      break;
    case DFPlayerUSBInserted:
      logSerial("DFPlayer: USB Inserted!");
      break;
    case DFPlayerUSBRemoved:
      logSerial("DFPlayer: USB Removed!");
      break;
    case DFPlayerPlayFinished:
      logSerial("DFPlayer: Number:"+(String)value+" Play Finished!");
      break;
    case DFPlayerError:
      switch (value) {
        case Busy:
          logSerial("DFPlayerError: Card not found");
          break;
        case Sleeping:
          logSerial("DFPlayerError: Sleeping");
          break;
        case SerialWrongStack:
          logSerial("DFPlayerError: Get Wrong Stack");
          break;
        case CheckSumNotMatch:
          logSerial("DFPlayerError: Check Sum Not Match");
          break;
        case FileIndexOut:
          logSerial("DFPlayerError: File Index Out of Bound");
          break;
        case FileMismatch:
          logSerial("DFPlayerError: Cannot Find File");
          break;
        case Advertise:
          logSerial("DFPlayerError: In Advertise");
          break;
        default:
          break;
      }
      break;
    default:
      break;
  }
}
A nice project. Reading a pulse dial requires a completely different technology in the software and a lot less inputs from the Arduino, but with some puzzling it turned out to be quite easy to read the LDR matrix of the GPO746.
Scanning it is similar to scanning a membrane keyboard or keypad. By successively addressing all line and column combinations, each individual LDR node can be reached and read.
The telephones discussed have now found a good home and are still used with great pleasure every day.